The Zion Traverse is a fabulous multi‑day backcountry hike that crisscrosses Zion National Park.
Where to start (East → West vs West → East)
Beginning in the east, in the quieter and less‑visited Kolob Canyons, and ending in the majestic Zion Canyon, the Traverse showcases the full variety Zion has to offer — largely without the infamous crowds. Traditionally, the route continued along the East Rim, but a 2019 rockfall closed access from Zion Canyon. Although the East Rim Trail is still hikeable, it can no longer be used as part of an uninterrupted Traverse. If you’re preparing to book your backcountry campsites, my Zion Traverse Permit Guide explains exactly how to secure the correct sites for your itinerary.
At 37 miles long, the Zion Traverse to Zion Canyon is ideal for a 2‑ or 3‑night backcountry camping experience. For a full day‑by‑day breakdown of the route, see my Zion Traverse Itinerary: 3 Days to Angel’s Landing.
East‑to‑West or West‑to‑East? How to Choose Your Zion Traverse Starting Point
As a point‑to‑point hike, the Traverse can be completed in either direction, but most hikers choose to go from Kolob Canyons to Zion Canyon. The reason is simple: Kolob Canyons is higher. La Verkin Creek Trailhead sits at roughly 6,000 feet, compared to The Grotto Trailhead in Zion Canyon at about 4,300 feet. Starting in Kolob Canyons means less overall elevation gain and an easier hike.
Zion Traverse Planning Map: Lee Pass to The Grotto, Kolob Terrace Road, Trailheads, and Campsites
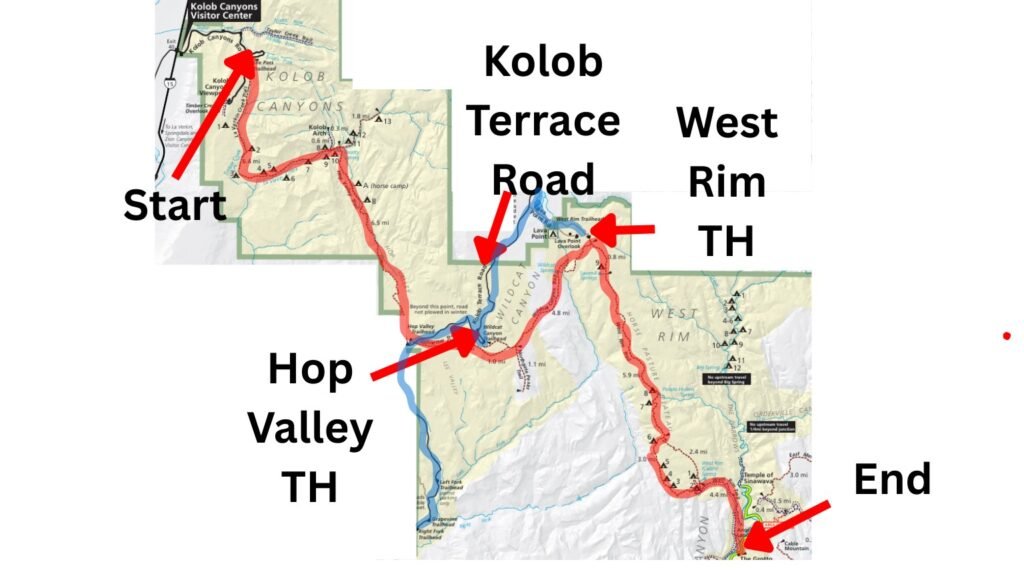
Annotated map of the modern Zion Traverse, showing the route from Lee Pass Trailhead to The Grotto in red and Kolob Terrace Road in blue. Base map © National Park Service. Source: https://www.nps.gov/zion/planyourvisit/upload/Map-Page.pdf
What’s the Best Zion Traverse Itinerary? Comparing 2‑Night and 3‑Night Routes
The 2‑Night Zion Traverse Itinerary
Here’s how the mileage and pacing typically break down.
This itinerary works best for hikers who can reach Lee Pass Trailhead early on Day 1. It allows time for a long break at La Verkin Creek before tackling the ascent into Hop Valley once the hottest hours of the day have passed. A 2‑night itinerary is especially suitable in cooler months when midday hiking is more tolerable.
Campsite Options (2‑Night Itinerary)
Best Campsite options for night 1
| Campsite | Distance from Start | Notes |
| La Verkin Creek Campsites 8–11 | 6–6.5 miles | Closest to Hop Valley Trail for a quick Day 2 start |
| Hop Valley B | 8.5 miles | Allows the most distance covered on Day 1 |
Best Campsite options for night 2
| Campsite | Distance from La Verkin Creek | Notes |
| Wildcat Canyon At‑Large Camping | ~12.5 miles | Flexible camping zone |
| West Rim Campsite 9 | ~16.5 miles | Best staging point for Day 3 |
Advantages of a 2‑Night Zion Traverse Itinerary
- Easier to secure permits for 2 nights rather than 3 during busy months
- Fewer meals and less water to pack and carry (lighter pack)
- Fewer hours of battery/charging to worry about
- Less time off work
- Suits strong hikers who prefer full, active days on the trail
Disadvantages of a 2‑Night Zion Traverse Itinerary
- Longer, more tiring days — especially challenging when daylight hours are short or in summer when midday hiking is unsafe
- Less time to enjoy the scenery
- Harder for mixed‑ability groups, including:
- hikers with different paces
- newer backpackers
- people sensitive to heat
- anyone carrying heavy camera gear
- Less time to enjoy camp
Water Considerations (2‑Night Itinerary)
For detailed spring reliability, cache locations, and seasonal water advice, see my How to Plan a Safe Zion Traverse Water Strategy page for full details on springs and how, where, and why to cache water.
A 2‑night itinerary means bigger mileage days, more time moving, and less time resting in shade — especially important in the hotter months. If you choose a 2‑night itinerary in warm weather, you must be comfortable carrying more water.
The 3‑Night Zion Traverse Itinerary
Here’s how the mileage and pacing typically break down.
A 3‑night itinerary is best for hikers who want a more relaxed experience, with extra time at viewpoints and longer evenings in camp. It’s ideal for mixed‑ability groups, those carrying heavier camera gear, or anyone who prefers not to haul large amounts of water. Lower daily mileage also makes the Traverse more comfortable in hot weather.
Campsite Options (3‑Night Itinerary)
Best Campsite options for night 1
| Campsite | Distance from Start | Notes |
| La Verkin Creek Campsites 6–13 | 6–7 miles | More flexible options than a 2-night itinerary |
| Hop Valley B | 8.5 miles | Big first day, but creates a relaxed Day 2 |
Best Campsite options for night 2:
| Campsite | Distance from La Verkin Creek | Notes |
| Wildcat Canyon At‑Large Camping | ~12.5 miles | Best spacing for a 3‑night plan |
| West Rim Campsite 9 | ~16.5 miles | Shorter Day 3 |
Best Campsite options for night 3:
| Campsite | Notes |
| Any West Rim Campsite past 9 | Comfortable finish on Day 4 |
| West Rim Campsites 1–3 | Ideal for beating the crowds to Angel’s Landing |
Advantages of a 3‑Night Zion Traverse Itinerary
- More time to enjoy the route — time to stop at viewpoints, for photography and to explore side trails, for example Northgate Peaks and Kolob Arch
- Shorter hiking days, especially helpful in warm weather
- More campsite flexibility, especially on the West Rim where there are 9 sites to choose from
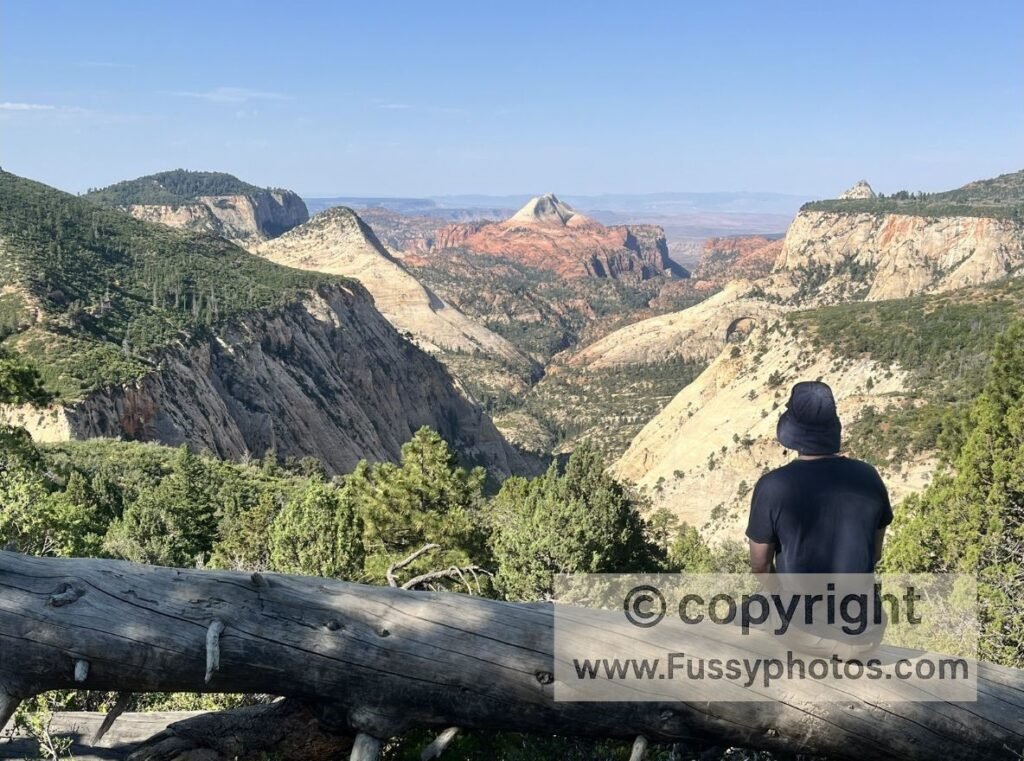
- Better recovery between days — there are some glorious views towards the end of the West Rim Trail. Another night’s camping allows more time in camp to eat, hydrate, and rest
Disadvantages of a 3‑Night Zion Traverse Itinerary
- More food weight at the start of the Traverse, when you’ll have to carry 3.5-4 days food per person
- More time off work
- More campsite reservations to secure — especially competitive in spring and early autumn
Water considerations on a 3‑Night Zion Traverse Itinerary
Shorter days mean you can carry less water at once and spend less time hiking in the hottest hours. In cooler months, springs such as Beatty Spring, Wildcat Spring, Sawmill Spring, Potato Hollow Spring, and West Rim (Cabin) Spring are more likely to be flowing, reducing the distance between water sources. If you’re considering hiking the West Rim as a standalone trip rather than as part of the full Traverse, my West Rim Trail: Top‑Down vs Bottom‑Up guide explains the route, campsites, water sources, and logistics in detail.
For detailed cache locations, spring reliability, and exact water amounts, see my How to Plan a Safe Zion Traverse Water Strategy guide.
Why you need a private shuttle to hike the Zion Traverse
Using 2 cars
It’s about an hour’s drive between the start (Kolob Canyons) and the finish (Zion Canyon). If you have two cars:
- Drive both cars to Springdale Visitor Center.
- Leave Car A there.
- Drive Car B to Kolob Canyons and leave it at the trailhead.
- After finishing the hike, use Car A to return to Kolob Canyons and retrieve Car B.
Using One Car
If you only have one car, you’ll need to leave it at the end of your hike (usually Springdale). Before arranging shuttles or planning your campsites, make sure you’ve secured the correct backcountry permits— my Zion Traverse Permit Guide: How to Book Campsites walks you through the Recreation.gov process step‑by‑step. Several private shuttle companies can take you to the start, including Zion Guru and Red Rock Shuttle (others exist).
Discover More Zion National Park Adventures
For more routes, permit advice and planning resources, explore my full Zion National Park guides collection — or dive into the pages below for detailed route breakdowns.