East Wonderland Trail Loop — Indian Bar, Panhandle Gap & Summerland: Wonderland’s Best, Without Competitive Permits
Day 2 continued: The Climb to Panhandle Gap
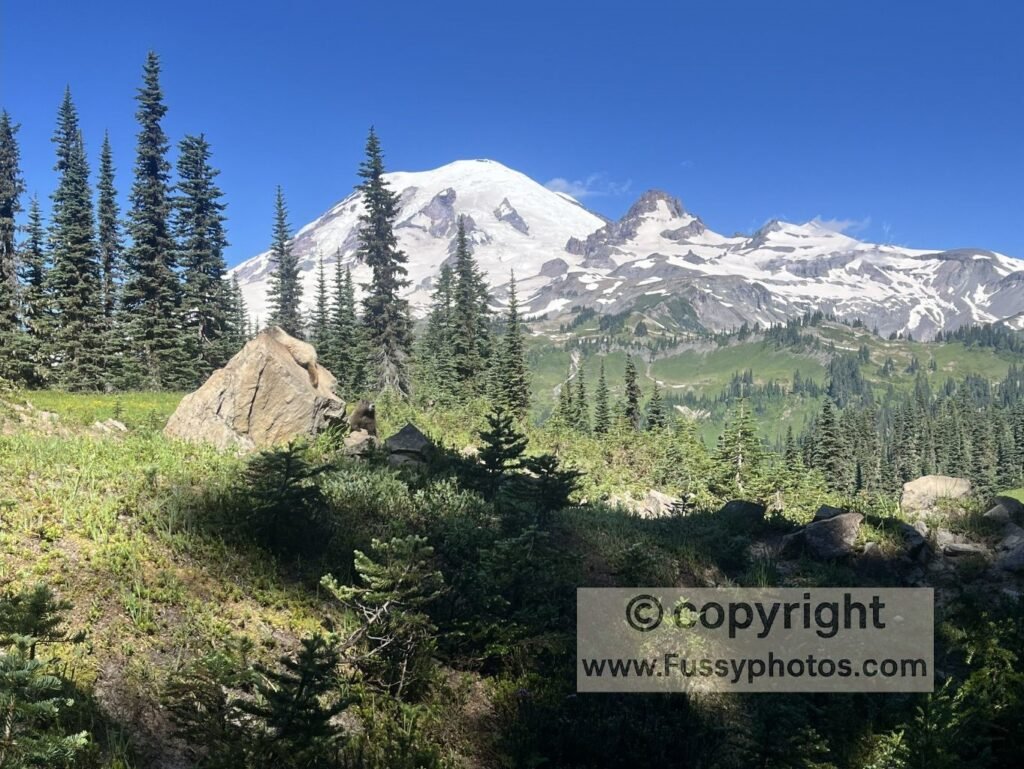
From Indian Bar, the trail climbs 1,900 feet in just 1.6 miles—a breathless ascent up another ridge radiating from the volcano’s core. While not as dramatic as the descent into Indian Bar, this section still offered rewards: the murmur and sight of Ohanapecosh Falls and tantalising glimpses of the Ohanapecosh Glacier snout to the west.
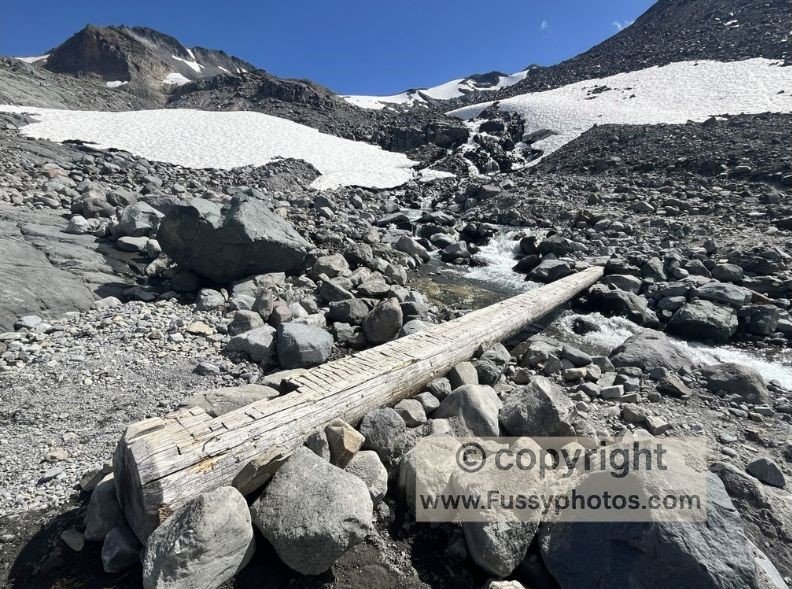
At around 6,600 feet, the trail leveled out. Ice littered the path, and we wondered when we would finally reach Panhandle Gap—the highest point on the Wonderland Trail between Indian Bar and Summerland. To the east, a distant fire revealed itself, thick smoke rising sharply into the sky. Concerned, we pressed on. At last, steep peaks and scattered snowfields signaled our arrival. The first snow crossing was straightforward, but for the second we were grateful to have crampons and trekking poles.

After five tense minutes of careful footing, we began our descent past glacial lakes, cascading waterfalls, and massive erratics on the way to Camp Summerland.
Summerland to White River
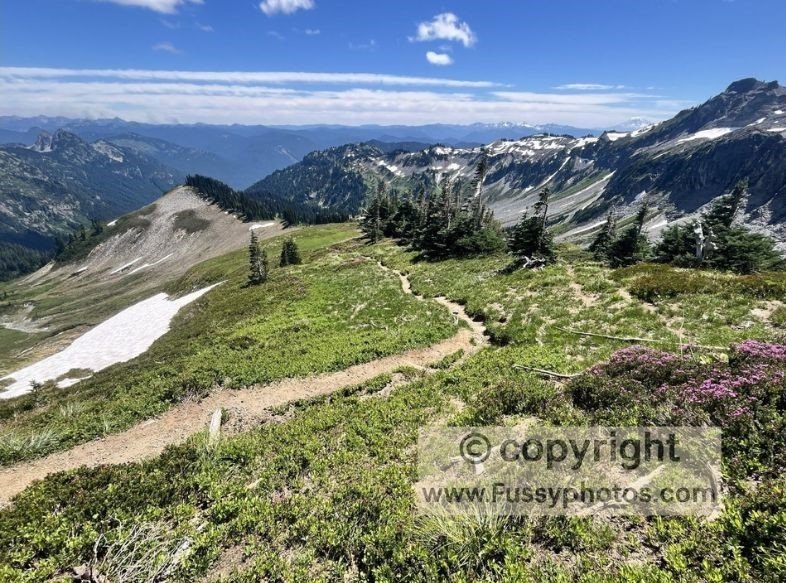
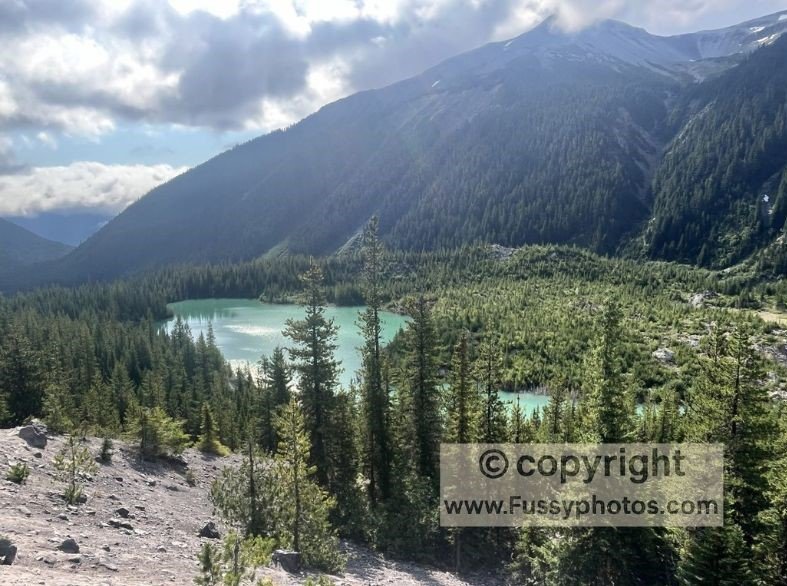
Above Summerland, the trail unfolded like a high‑altitude gallery—glacial erratics, braided meltwater streams, and silver waterfalls spilling down rock faces. We longed to linger, but the day was closing in. Miles later, twelve hours after setting out, we stumbled into White River Campground—too spent to push on to Glacier Basin, yet exhilarated by the day, we gratefully secured a walk‑in site.
Glacier Basin Side-Hike & Tamanos Creek — Day 3 of Wonderland’s Best, Without Competitive Permits
The next morning, instead of heading east to Tamanos Creek, we left our bags and enjoyed a relaxed side-hike along the Glacier Basin Trail. From a ridge of lateral moraine, we admired the snout of Emmons Glacier—the largest glacier by surface area in the lower 48 States.
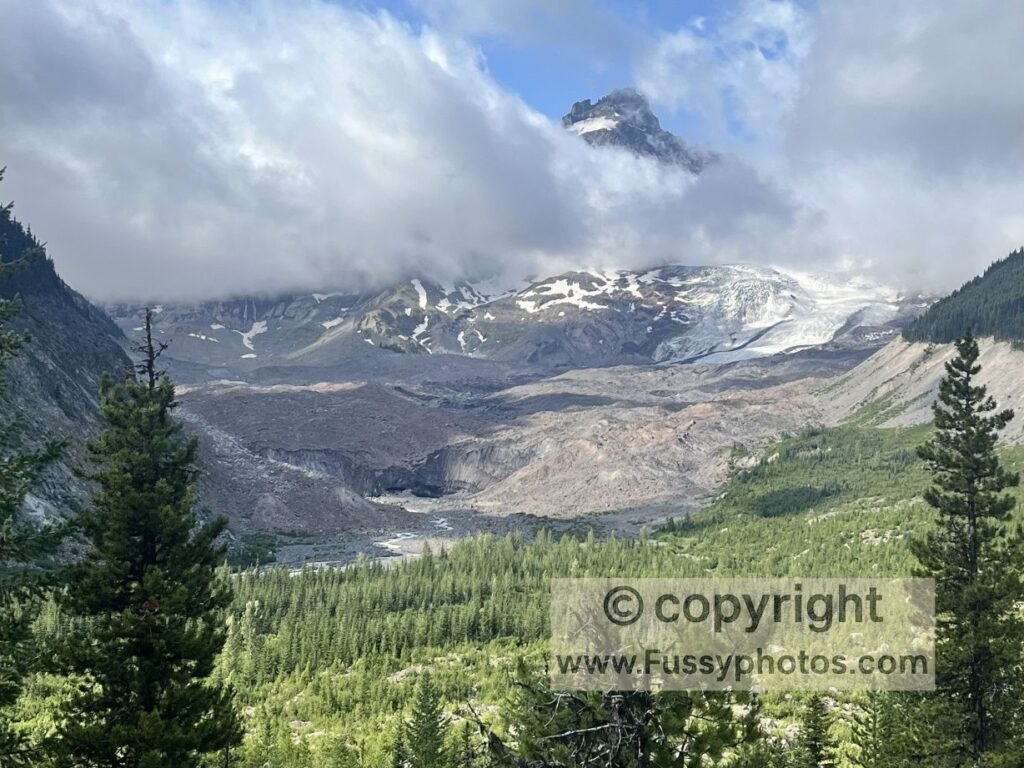
Clouds obscured much of the glacier, but the massive terminal moraine, turquoise proglacial lake, and the sound of Inter Fork—a tributary of the White River—made the hike worthwhile.
Final Push to Tamanos Creek
After packing up, we retraced our steps on the Wonderland Trail, then headed east parallel to White River before joining Owyhigh Lakes Trail—a wooded path that wasted no time in reminding us we weren’t done climbing.
The switchbacks burned, and the views were fewer. By the time we reached Tamanos Creek Campground, our legs were leaden and our bear canister nearly empty.
A cold night followed, and the shaded, north-facing slopes made for a frigid morning.
Day 4 — Completing the Loop: Tamanos Creek to Stevens Canyon
With a plane to catch and 12 miles to the car, we set off quickly, hoping to warm up. The trail ran north to south in the shadow of surrounding peaks, with occasional meadows glistening in morning dew.

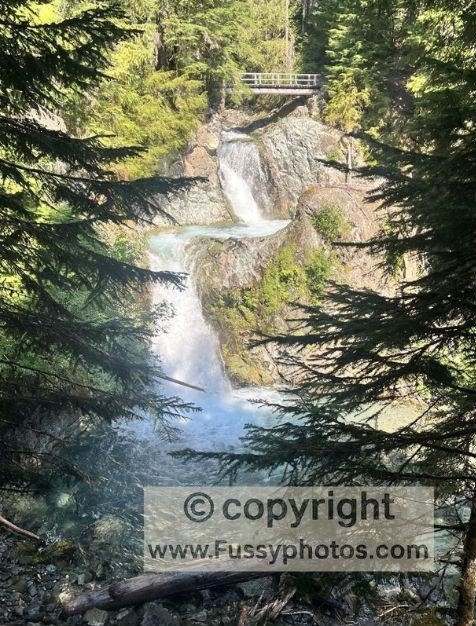
We passed Deer Creek Campground near Chinook Creek and State Route 123, then followed the forested East Side Trail back to our car—an uneventful but peaceful finish, punctuated by waterfalls and wooden bridges.
Route Overview & Planning Tips for Wonderland’s Best, Without Competitive Permits
- Trailhead: Stevens Canyon Entrance
- Route: Stevens Canyon → Ollie Creek → Indian Bar → Panhandle Gap → Summerland → White River → Emmons Glacier Lookout→ Tamanos Creek → East Side Trail → Stevens Canyon
Wonderland Trail East Side Map & Elevation Profile
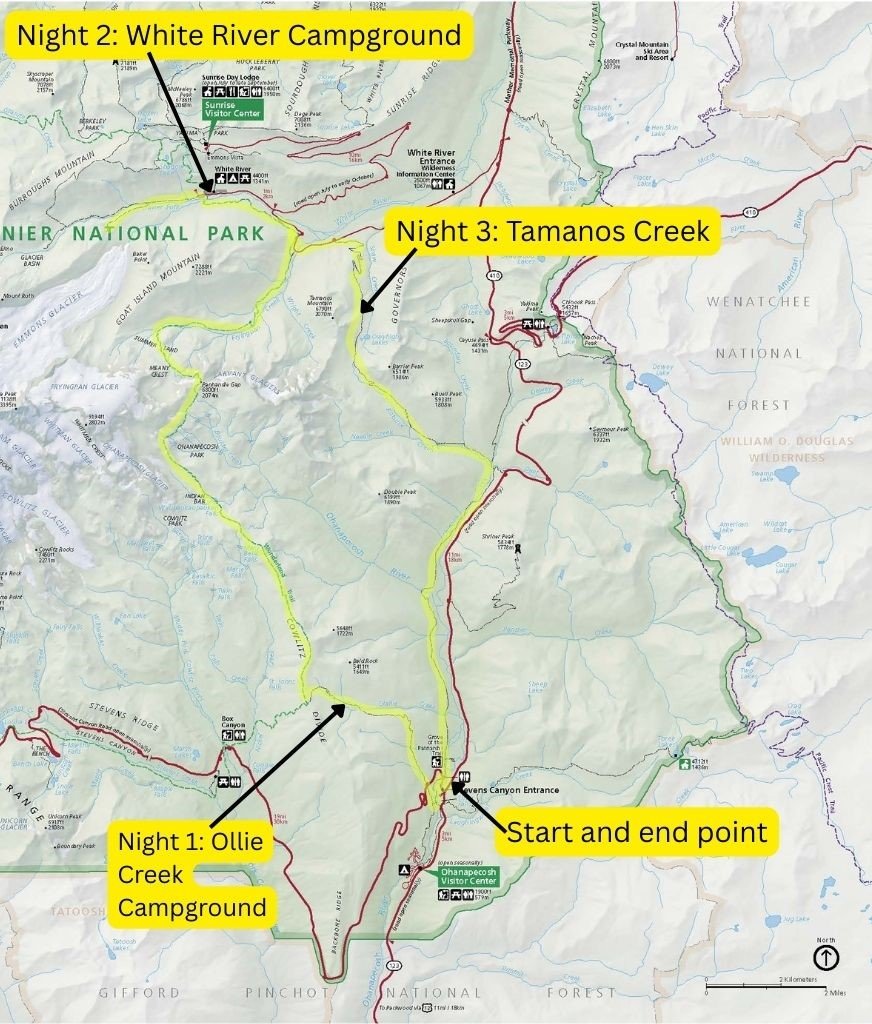
Map courtesy of the U.S. National Park Service (NPS), sourced from the official NPS Media Gallery. Public domain image. Used respectfully for educational and informational purposes. No endorsement implied. Annotations made independently.
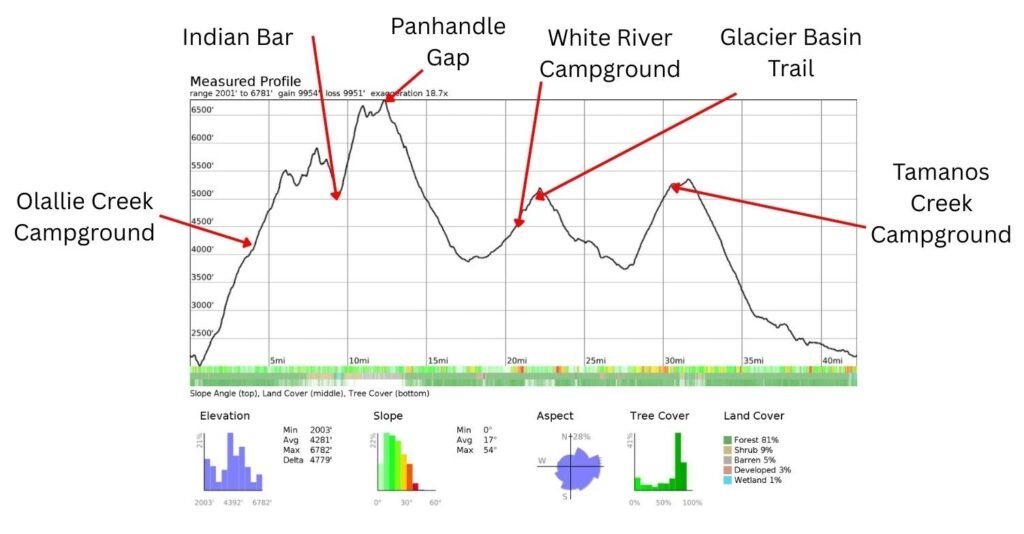
- Distance: 42 miles over 4 days
- Elevation gain: 9800 feet total
- Best season: July–September
- Permit required: Yes (Mount Rainier National Park backcountry)
- Bear safety: Bear canisters required or scented items must be hung from a bear-pole lockers available at some camps
- Water sources: Nickel Creek, Indian Bar, Summerland, Glacier Basin, Tamanos Creek and others
Watch Part 2: Backpacking Mount Rainier’s East Wonderland Loop Without Competitive Permits

Wonderland Trail East Side Gear Guide: Indian Bar, Panhandle Gap & Summerland
Why This Gear List Matters
From rope bridges and glacial lakes to mosquito swarms and snow crossings, this 4-day loop on the east side of the Wonderland Trail packs in everything Mount Rainier National Park is known for. With over 42 miles of hiking, 9800 feet of elevation gain, and campsites like Ollie Creek and Tamanos Creek, this route demands gear that’s lightweight, versatile, and ready for alpine conditions.
Navigation & Trail Essentials
- GPS app (Gaia, AllTrails or Maps.me) – Crucial for junctions near Owyhigh Lakes and Stevens Canyon
- Paper topographic map – Backup for electronic failure
- Compass – Useful in forested sections and snowfields
- Permit printout – Required for backcountry campsites in Mount Rainier National Park
- Route notes or GPX file – Preloaded with elevation profiles, water sources, and snow crossings
Footwear & Traction
- Sturdy hiking boots – With ankle support for steep climbs and snow patches
- Crampons or microspikes – Essential for Panhandle Gap snowfields
- Trekking poles – Useful for switchbacks, snow crossings, and descents
Clothing for Rainier Conditions
- Insulated jacket (down or synthetic) – For cold nights at Ollie and Tamanos Creek
- Base layers (top and bottom) – Merino or synthetic for moisture control
- Windproof shell – For exposed ridgelines and glacial valleys
- Rain jacket and pants – Rainier is overcast or wet 39% of July (WeatherSpark)
- Sun hat and sunglasses – For high UV exposure at Panhandle Gap
- Bug net or head covering – Mosquitoes were relentless near Ollie Creek
Sleep System
- Tent rated for alpine conditions – Lightweight but wind-resistant
- Sleeping bag (15–30°F rating) – For frigid nights on north-facing slopes, e.g. Tamanos Creek Campground
- Sleeping pad (insulated) – Comfort and warmth on rocky terrain
- Pillow or stuff sack with clothes – Optional but appreciated
Cooking & Hydration
- Lightweight stove – For boiling water at high elevation
- Fuel canister – Always take more than you need
- Pot and utensils – Compact and easy to clean
- Water purifier or filter – Essential for creeks, meltwater, and glacial runoff
- Backup lighter or waterproof matches – Always carry a spare ignition source
Safety & Extras
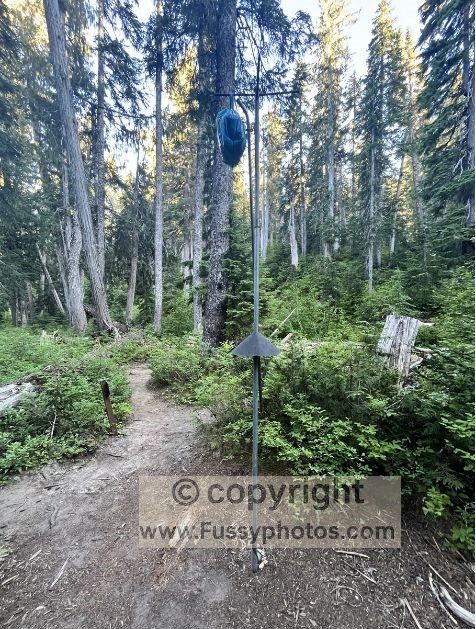
- Bear canister – For food storage at all Rainier backcountry camps, though you can hang your food
- First aid kit – Include altitude meds, blister care, and antihistamines
- Headlamp with extra batteries – For late camp setup and forest navigation
- Sunscreen and lip balm – High UV exposure at elevation
- Bug spray (DEET or Picaridin) – Minimise those bites
- Multi-tool or knife – For gear repairs and food prep
- Quick-dry towel – For creek dips and drying gear
- Trash bag – Pack out all waste—no bins in wilderness zones but you can take trash to front country campgrounds e.g. White River
FAQs: East Wonderland Trail Loop
What makes the east side of the Wonderland Trail so special?
This section includes some of Mount Rainier’s most iconic scenery: Indian Bar’s radiant basin, the dramatic climb to Panhandle Gap, glacial lakes, waterfalls, erratics, and sweeping views of Mount Rainier, Mount St. Helens, and the Nickel Creek valley.
Can I backpack Indian Bar, Panhandle Gap, and Summerland without competitive permits?
Yes. Instead of competing for Indian Bar or Summerland permits, you can reserve nearby camps like Ollie Creek, Glacier Basin, or Tamanos Creek. These allow you to complete a multi‑day loop that still includes all the east‑side highlights.
How long is the East Wonderland Trail loop?
The loop is roughly 36 miles, or 42 miles if you include the Glacier Basin side‑hike. Most hikers complete it in 3–4 days, depending on fitness and route variations.
Where can I park to start the East Wonderland Trail loop?
You can begin the loop from several trailheads:
White River Campground — ideal for food caching
Stevens Canyon Road near Silver Falls — convenient southern start
Owyhigh Lakes Trail South parking — good if you want to finish with a downhill
What’s the best season to hike the east side of the Wonderland Trail?
July–September is ideal. Snowfields at Panhandle Gap can linger into July, and Mount Rainier is overcast around 39% of the time, so be prepared for rapidly changing weather.
Is the water safe to drink on the east side of the Wonderland Trail?
Yes, but avoid glaciated water, which is milky with rock flour and can clog filters. Stick to clear streams and lakes, and always purify or boil your water. Water is abundant.
Are bear canisters required on this loop?
All backcountry camps in Mount Rainier National Park require proper food storage. Some camps have bear poles, but a canister is still recommended.
What gear do I need for a 4‑day East Wonderland Trail loop?
This route requires alpine‑ready gear, including sturdy boots, microspikes or crampons, trekking poles, insulated layers, rain gear, a warm sleeping system, a stove, a water filter, navigation tools, a bear canister, and a full first‑aid kit. See my gear-list above.
Are there toilets at the backcountry camps?
Yes. All camps on this loop have toilets:
- Ollie Creek — outdoor pit toilet
- Tamanos Creek — outdoor pit toilet
- Indian Bar — established toilet
- Summerland — established toilet
- White River — full campground facilities
Can I cache food at White River Campground?
Yes — if you drive there before your hike. White River Campground has bear‑proof storage lockers where you can leave a food cache. This is ideal for reducing pack weight on the 36–42 mile loop.
How hard is the climb from Indian Bar to Panhandle Gap?
The ascent from Indian Bar to Panhandle Gap is one of the steepest sections on the Wonderland Trail, gaining around 1,900 feet in 1.6 miles. Expect snow patches even in July, icy footing, and exposure. Trekking poles and microspikes or crampons make this section far safer and more comfortable.
Do I need special gear for Panhandle Gap?
Panhandle Gap often holds snowfields well into summer. Microspikes or crampons, trekking poles, and a windproof layer are strongly recommended. Navigation tools (GPS or map/compass) are useful if snow obscures the trail.
How difficult is the climb to Tamanos Creek from White River?
It’s a demanding climb with steep switchbacks and fewer views. Tamanos Creek is shaded and north‑facing, so expect a colder night.
What is the final day like from Tamanos Creek back to Stevens Canyon?
The final stretch is long but peaceful, following forested slopes, meadows, waterfalls, and wooden bridges along the East Side Trail.
What is Leave No Trace, and why does it matter here?
Leave No Trace (LNT) is a set of outdoor ethics designed to minimise human impact. On the Wonderland Trail, this means packing out all rubbish, staying on established trails, camping only in designated sites, storing food properly, respecting wildlife, and leaving natural features untouched. The east side’s alpine meadows and glacial valleys are especially fragile.
How Mount Rainer National Park Fits into a northwest Road Trip
- Goat Rocks Wilderness: Just south of Rainier, Goat Rocks offers rugged volcanic ridgelines and alpine meadows—ideal for backpackers seeking a less-permitted alternative to Rainier’s Wonderland Trail
- Seattle: Just 2 hours from Rainier’s Nisqually entrance, Seattle serves as a launchpad for gear, groceries, and last-minute logistics.
- Glacier National Park: Glacier lies ~500 miles east of Rainier, making it a dramatic finale or kickoff for a northern Rockies loop.
- Smith Rock State Park: Located in central Oregon, Smith Rock’s high desert cliffs and golden hues contrast sharply with Rainier’s alpine greenery and snowfields.
Discover More Mount Rainer National Park Adventures
Pacific Northwest Hiking & Backpacking Routes
For more classic Pacific Northwest routes with the same mix of volcanic peaks, alpine meadows, and big‑mile backcountry travel, explore the wider collection of hikes and backpacking trips across the region.
Backpacking Routes of the American West
For more multi‑day backcountry routes with big mileage, detailed logistics, and classic Western landscapes, explore the wider collection of Backpacking Routes of the American West.