
How to Successfully Hike a Thrilling Grand Canyon Rim-to-River-to-Rim Loop
Best Timing for the Grand Canyon Rim‑to‑River‑to‑Rim Loop: Begin at Dawn on South Kaibab Trail
As with my first attempt, it was vital to start a big Grand Canyon hike as early as possible. For this Grand Canyon Rim-to-River-to-Rim Loop, we left our car at the Grand Canyon Visitor Center in time to catch the first shuttle to the South Kaibab Trailhead (around 4:30–5 a.m. in summer — check the timetable on the Grand Canyon NPS website).
If you’re still planning your visit or want a broader overview of the park, my Grand Canyon See, Hike, and Survive guide covers everything from viewpoints and trail options to road‑trip ideas.
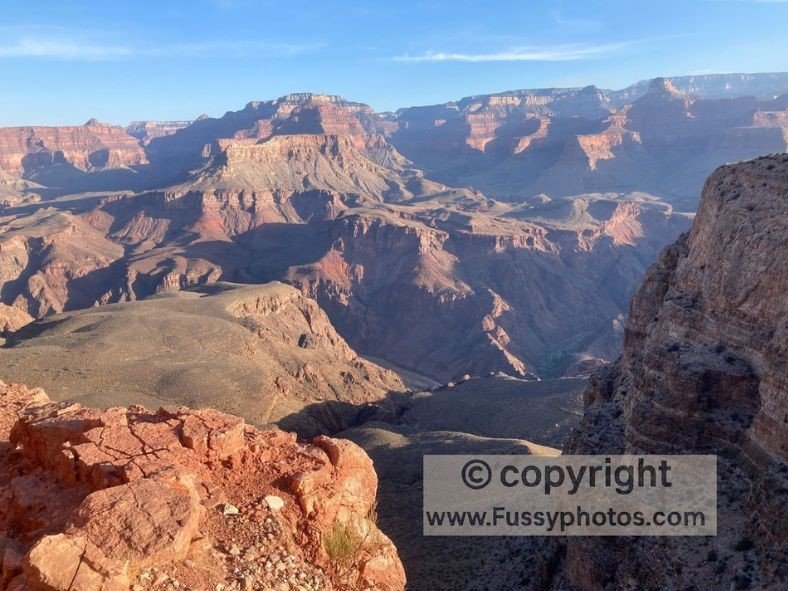
As we reached the trailhead, it was first light, just bright enough to hike without headlamps. The South Kaibab Trail starts immediately with switchbacks, descending sharply with a large drop-off to the left, giving an instant perspective of the scale of the first cliff terrace.
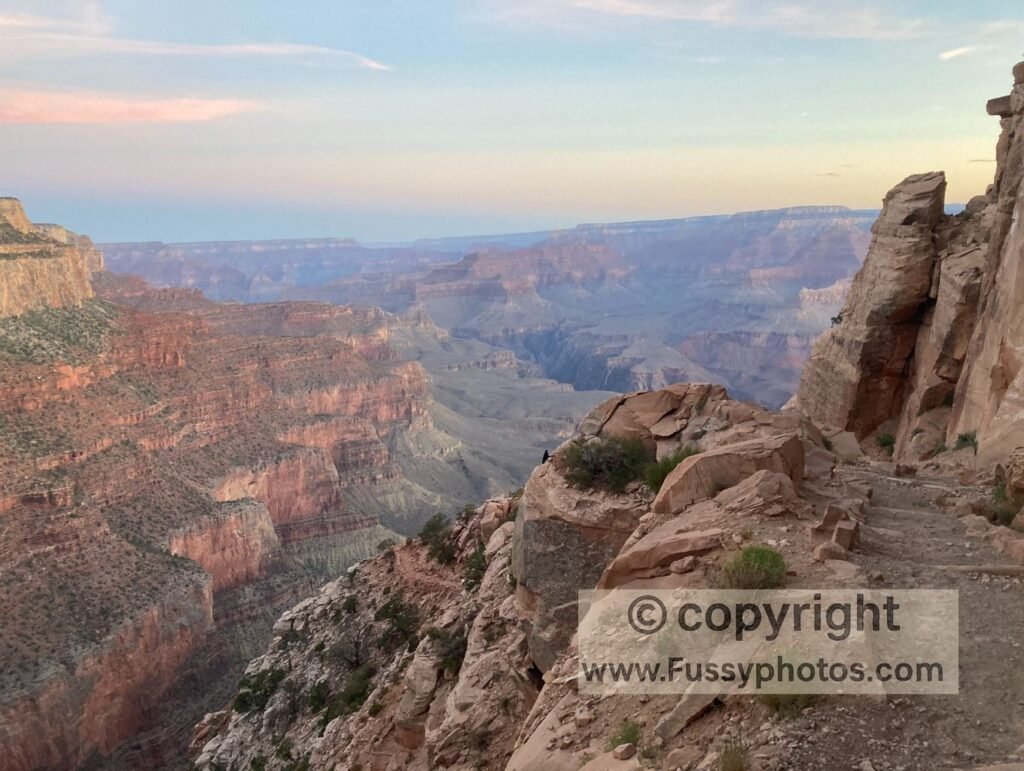
The trail juts out into the canyon, offering a whole new perspective compared to views from the rim — almost as if you are seeing it in 3D rather than 2D.
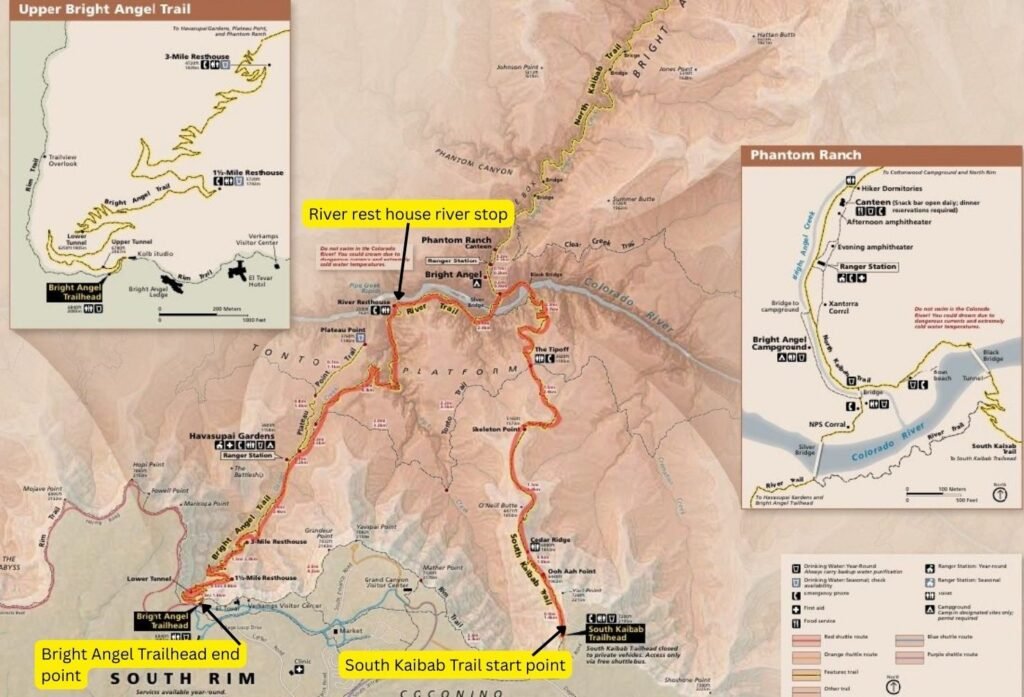
Grand Canyon Rim-to-River-to-Rim Loop Route Map & Elevation Profile
South Kaibab Trail (Descent)
Ooh‑Aah Point
After a mile of hiking, you’ll have descended about 500 feet and reached the first landmark of the trail: Ooh-Aah Point. As you pass an outcrop of rock on your right, the views become wider and more panoramic, and the name of the landmark becomes very apparent.
Cedar Ridge
Another half-mile brings you to Cedar Ridge, a small flat area on an otherwise narrow ridge. It’s another great spot for photos and a sensible turnaround point for many hikers.
If you choose to continue, the ridge takes you further into the canyon toward O’Neill Butte, a prominent landmark rising up from the trail while everything else around you falls away. It’s a great backdrop for more photos.
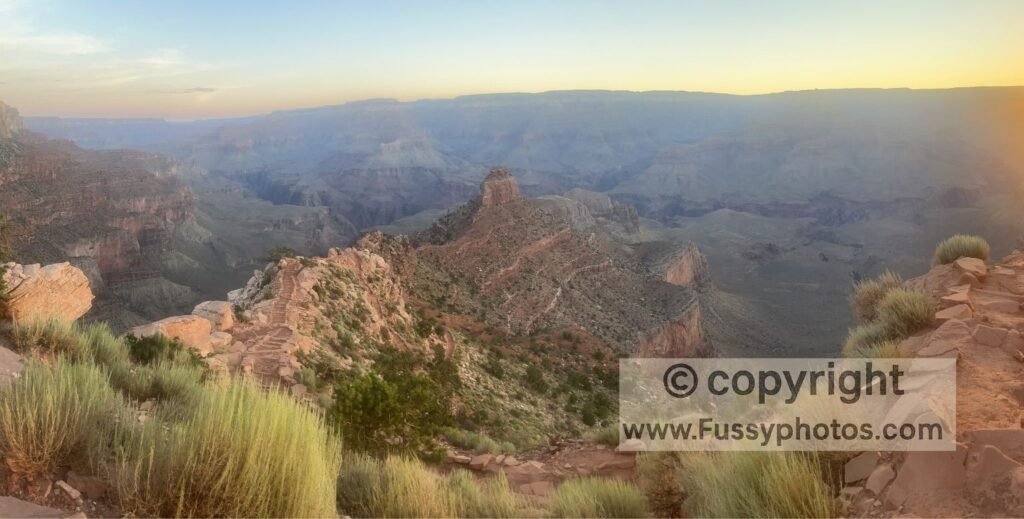
Skeleton Point: First Views of the Colorado River
To the right of O’Neill Butte, the trail continues another mile to Skeleton Point. What’s remarkable about the Grand Canyon is that you won’t feel like you’re exerting yourself with all this hiking. For one, you’re constantly moving downhill at a steady enough gradient to spare your knees. Secondly, it’s like walking above a strange, wonderful world below you.
The land around you is tiered like giant steps, the result of differential erosion of the various rock types that make up the canyon. The effect is that the land appears to descend in a series of distinct steps and cliffs. Up to this point, the South Kaibab Trail has protruded into the next step, so lower down to your left and right is the step below, hundreds of feet beneath you — a bit like being in a skyscraper looking down on a city.
Skeleton Point is special, giving you your first views of the muddy Colorado River still far below. Looking back, the rim is now high above. Though the South Kaibab Trail is perfectly graded to this point, the land around you is far from gentle, with huge vertical cliff walls rising from the tiered land below.
Descending to the Tip-Off and the Final Drop
To descend further, the trail drops quickly to the next tier, a series of spectacular switchbacks taking you down some 700 feet in little time — and millions of years back in geologic time.
The Tip-Off shelter comes into sight, a welcome rest house designed to provide shade for hot hikers, with screens allowing what little airflow there is to cool you down.
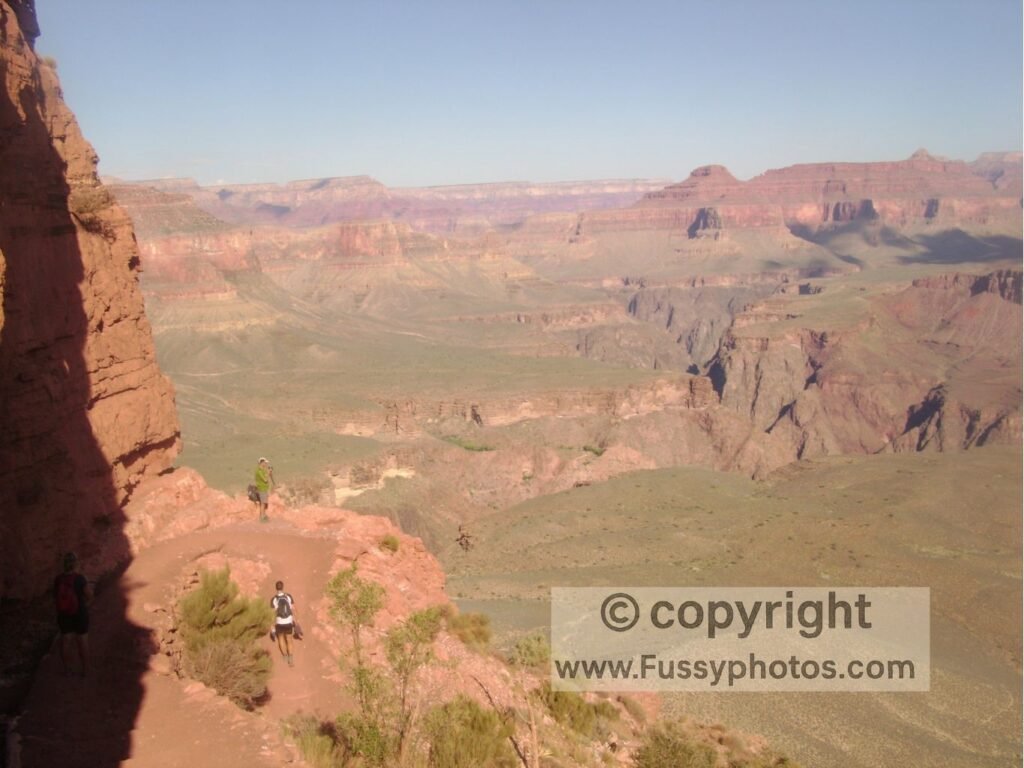
Beyond the shelter, the trail takes you toward the final drop to the river. This is my favorite stretch of the trail, and the world‑class views here lead me to rank the South Kaibab Trail as the best I’ve ever walked — though if I had to return via this trail instead of Bright Angel Trail and take it uphill, I might change that judgment.
This section offers superb views of the cliffs on both sides of the river, with sightlines up to the North Rim. At this stage, you’re truly grasping the enormity and complexity of the canyon — you’re in it, not just looking down on it. You can also hear the river now, roaring in the background some 1,200 feet below.
By this point, most other day hikers will have turned around, so the full sensory experience — the views, the sound of the river, the scale of the canyon, and the solitude — adds up to one vivid and unforgettable experience.
South Kaibab Trail Heat Safety: Why You Must Be Off by 10 a.m.
It’s best not to stay linger on the trail for too long, as it still gets hot here. It was 8:30 a.m., and after taking it slow to soak in the views and snap some photos, there’s still 1.3 miles to reach the South Kaibab Trail suspension bridge—and 3.2 miles to my preferred riverside spot near the River Resthouse at the end of the Bright Angel Trail.
It’s imperative to stop hiking by 10 a.m., ideally even earlier. If you find yourself running late, there are river beaches closer by, near Bright Angel Campground. Your best bet might be to reach one of these or head for Phantom Ranch instead.
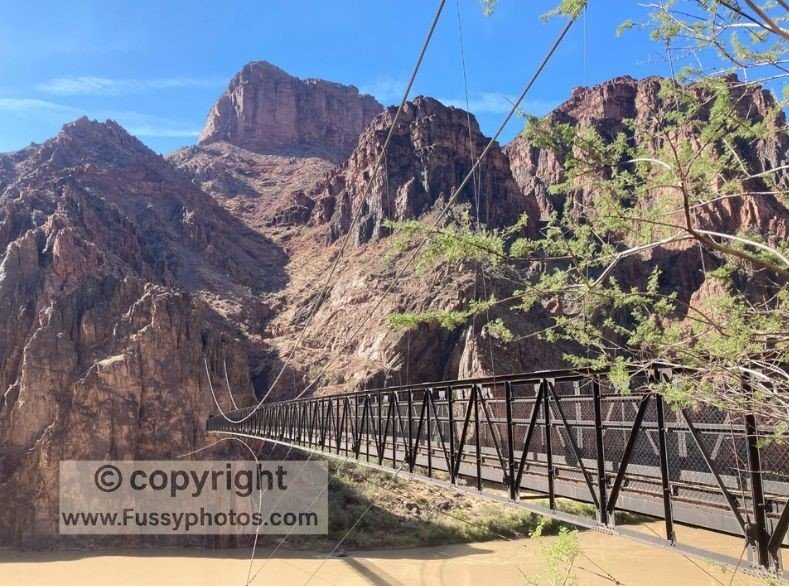
Reaching the Colorado River and Crossing the Suspension Bridge
Feeling so close, it’s amazing how far you still have to go to reach the river. Our aim was to reach the valley bottom, cross the iconic South Kaibab Trail suspension bridge, and get to the river.
While many hikers detour to Phantom Ranch for lemonade or snacks, the river itself is essential for keeping you cool through the hottest part of the day. The bottom of the canyon is significantly warmer than the rim. Temperature increases by about 5.5°F with each 1,000 feet of elevation loss (NPS), and by now we were almost 5,000 feet lower than when we started that morning. I’ve written separately about desert heat strategy in Death Valley, which shares many of the same heat-management challenges.
Cooling Off at the Bottom of the Grand Canyon: Colorado River & River Trail
At this point, I was still feeling good, but my partner needed to cool down. We hurried along the North Kaibab Trail, turning left at the junction with Bright Angel Campground (and the North Kaibab Trail as it makes its route to Phantom Ranch and beyond), and took the River Trail. This crosses the Colorado River a second time over the Silver Bridge. Signage is clear, so with care it’s hard to go the wrong way, but it’s still wise to have a GPS — a wrong turn here could be dangerous.
Considering how much the river is managed upstream, you can only imagine what it must have looked like in full flow. You get a sense of its erosive power and why the canyon is so vast.
Resting at the River During Peak Heat
We followed the River Trail west as it rose and narrowed, hugging the cliff walls and offering occasional, elusive shade (this will depend on the time of day of course). Along the way, we saw rafts drifting on the Colorado River, a reminder of the many ways people experience the canyon.
River Resthouse marks the bottom of the Bright Angel Trail. Here there are restrooms, but more importantly, access to the river itself via a slip-off slope — an area of sandy deposition about 50 meters off the trail. We sat on the slope, soaked our clothes, and stayed at the water’s edge for the better part of five hours.
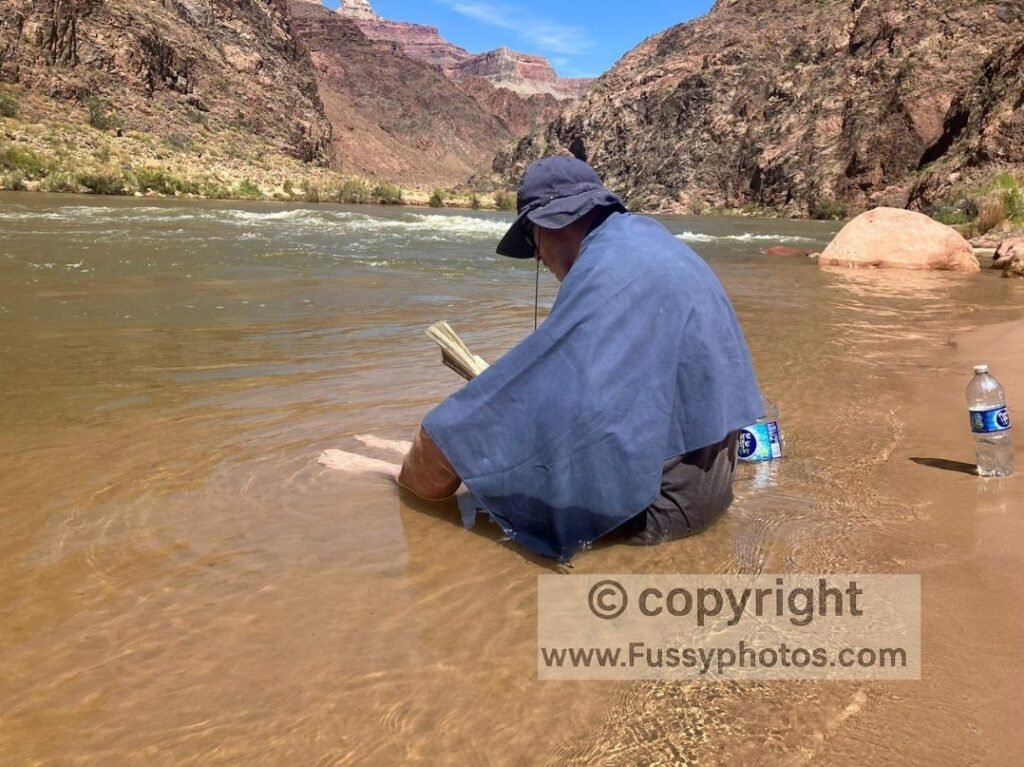
This strategy requires discipline. Sitting around for four to five hours anywhere can get dull, even in the Grand Canyon. But you won’t be alone — other hikers will join you, so there’s conversation to be had. I even brought a book down for this hike. Being in one of the best hiking spots in the world, it’s tempting to leave early and keep moving, but resisting that inclination is essential.
On my first trip to the river, I ignored this advice and left too soon. This time, I followed the mantra of don’t hike between 10 a.m. and 4 p.m. as closely as possible. It’s a balancing act in the Grand Canyon: leave too soon and you’ll be hiking in the hottest part of the day; leave too late and you risk hiking out in the dark. Estimating that if we left just before 4 p.m., we’d have about three and a half hours to reach the rim before sunset, we stayed disciplined. I practiced a similar strategy on my Capitol Reef backcountry loop, where the high‑walled canyons became stifling by late morning and required long, disciplined breaks in the shade.
Just before setting off, we soaked our clothes one final time. This strategy helps keep you cool — instead of losing valuable fluids through sweat, the water from your shirt evaporates. It’s amazing how quickly even sodden clothes dry here. Feeling confident, cool, and refreshed, we hit the trail.
Bright Angel Trail (Ascent)
Pipe Creek
The Bright Angel Trail closely follows Pipe Creek through a narrow canyon. It was still hot as the walls released the sun’s stored heat, but it wasn’t the stifling furnace I had suffered through the year before. We made good progress, our shirts bone dry by the time we had finished the switchbacks and left this narrow section.
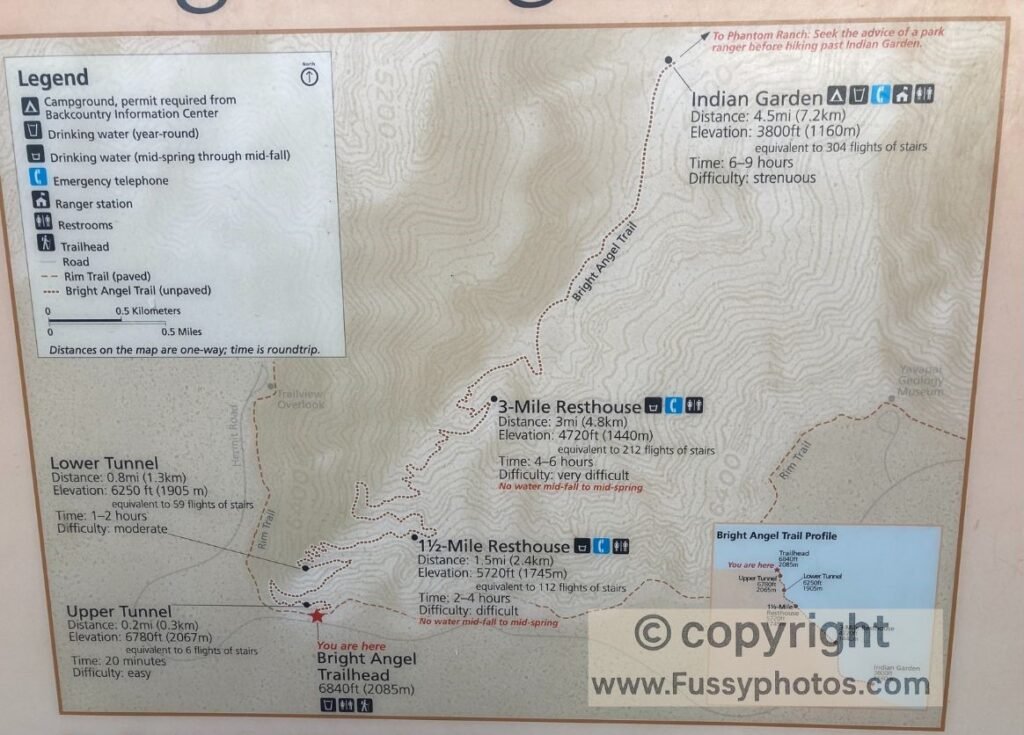
Havasupai Gardens
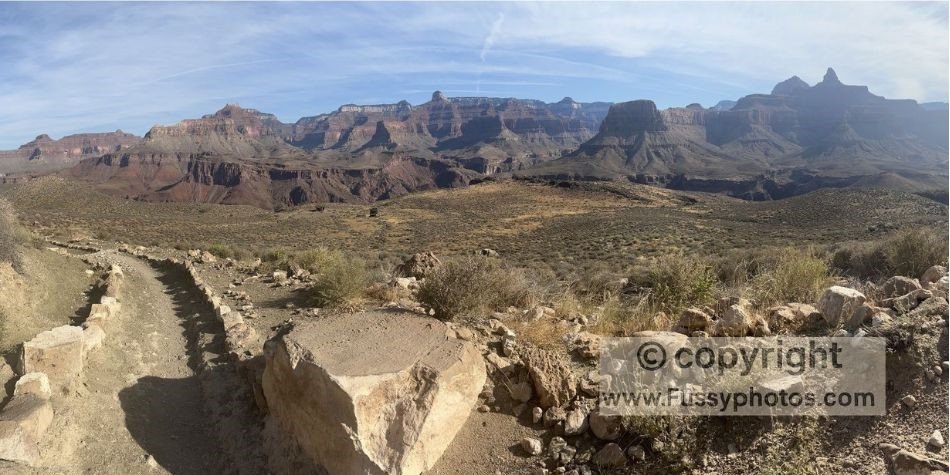
The trail loops north, then south, as it follows Garden Creek — a scarce but welcome source of water — past Havasupai Gardens to the massive cliffs before the final ascent. Take the opportunity to dip your shirt in the creek until you reach Havasupai Gardens, where there’s a faucet and some shade.
Now 3.2 miles and 1,500 feet of elevation gain up the trail, temperatures were still hot but notably cooler. We stopped to make ourselves as comfortable as possible at Havasupai Gardens, enjoying a rest on a bench and another salty snack before pushing on to tackle the final 3,000 feet of elevation.
The Long Ascent from Three‑Mile Resthouse to the Rim
I’d argue the next section of trail is not as scenic compared to South Kaibab, with Bright Angel offering fewer panoramic views. But as you approach the Three-Mile Resthouse, the wall of rock in front of you is mightily impressive. The trail switches back again and again, and here the key is patience.
Progress feels slow. With three miles to go, mentally you feel like you’re almost there, but in reality it’s still another 2,100 feet up. We settled into a rhythm of regular rests and sips of sugary drinks every few minutes, trying to keep enjoying the hike even as fatigue set in.
Each time I’ve hiked Bright Angel, there have been rangers on the route, supporting hikers if needed and no doubt watching for stragglers and potential health emergencies. Following a similar strategy of waiting out the hottest midday hours, we weren’t alone — a handful of other hikers toiled alongside us.
There are water stations at Havasupai Gardens, Three-Mile Resthouse, and Mile-and-a-Half Resthouse. These are turned on May through October, so water wasn’t a problem. Still, I caution again: it’s best to have sugary drinks or electrolytes to avoid the risk of hyponatremia.
Fortunately, this time tiredness was our only problem. The trail undoubtedly requires determination, but it was manageable.
Reaching the Rim After a 14.5-Hour Grand Canyon Rim-to-River-to-Rim Loop Adventure
You’ll know you’re nearing the trailhead when the path suddenly fills with casual hikers sampling a short stretch of Bright Angel. By the time we neared the rim, we had missed the sunset — we were too low in the canyon to see the illumination of the cliffs.
Shuttles run from Bright Angel, with times varying by season. By the time we exited the trail and found our seats, it was pitch dark. We had timed the hike perfectly, spending approximately 14.5 hours in the canyon, with under 10 hours of actual hiking.
Camping Below the Rim on the Grand Canyon Rim‑to‑River‑to‑Rim Loop: Split the Journey
If you’re able, one safe way to complete this hike is by securing permits to camp in the canyon—either at Bright Angel Campground or Havasupai Gardens. This allows you to split the hike over two days, minimizing exertion and potential heat exposure.
You’ll still want to follow many of the tips I outlined above. I haven’t camped in the Grand Canyon yet, but it’s number one on my list for next time I return.
Essential Gear Checklist for the Grand Canyon Rim-to-River-to-Rim Loop via South Kaibab and Bright Angel Trails
Hydration & Nutrition
- Several liters of fluids and water capacity (hydration bladder + bottles): – Essential for the long descent on South Kaibab, where there’s no water until the river. – Bright Angel has seasonal water stations, but you should try not to rely on them exclusively.
- Electrolyte tablets or sports drink mix: – Prevents dangerous sodium loss (hyponatremia), which can occur if you drink only plain water.
- Salty snacks (nuts, pretzels, jerky): – Follow NPS advice to eat more than usual, with a focus on salt to replace what you lose in sweat.
- Sugary snacks (energy chews, dried fruit, bars): – Provide quick energy for steep climbs, especially on the Bright Angel switchbacks.
Clothing & Heat Management
- Loose & Lightweight clothing: – Vital for coping with the intense heat in sections like Pipe Creek and Devil’s Corkscrew.
- Wide‑brimmed hat & sunglasses: – Protect against relentless sun exposure on South Kaibab, which offers no shade.
- Cooling strategy: soak clothes: – At the Colorado River and Garden Creek, soaking clothes helps regulate body temperature.
- Light insulating layer: – For the rim at dawn and after dark, when temperatures can drop sharply.
Footwear & Support
- Sturdy hiking boots or trail shoes with grip: – Needed for the steep South Kaibab descent and the long Bright Angel ascent.
- Trekking poles: – Optional but reduce knee strain on the 4,700‑foot descent and provide rhythm on the 4,500‑foot climb.
- Blister kit (tape, plasters, lubricant): – Optional but long mileage and heat make hotspots more likely.
Navigation & Timing
- Headlamp with spare batteries — essential if you finish after dark, which is possible on the Grand Canyon Rim-to-River-to-Rim Loop.
- GPS or offline trail map: – Signage is good, but a wrong turn at the Silver Bridge / River Trail junction could be dangerous.
- Watch or phone with alarm: – Helps enforce discipline at the river — waiting out the midday heat until late afternoon before climbing.
Safety & Comfort
- First aid kit (bandages, pain relief, rehydration salts): – For minor injuries or heat‑related issues.
- Lightweight emergency blanket: – Insurance against unexpected delays or exhaustion.
- Sunscreen & lip balm: – For the relentless exposure on South Kaibab.
- Book or small entertainment: – Useful during the 4–5 hours of enforced rest at the river.
Optional but Useful
Cash or card: – If you decide to detour to Phantom Ranch for lemonade or snacks.
FAQs: Hiking to the Grand Canyon’s Bottom via South Kaibab & Bright Angel
How hard is it to hike into the Grand Canyon?
Hiking downhill into the canyon is enjoyable, even in the heat. However, climbing back up is extremely strenuous due to the combination of heat and the steepness of the trail. You should not attempt to hike to the bottom on a whim — it requires careful planning and preparation.
How hard is the Grand Canyon Rim-to-River-to-Rim Loop?
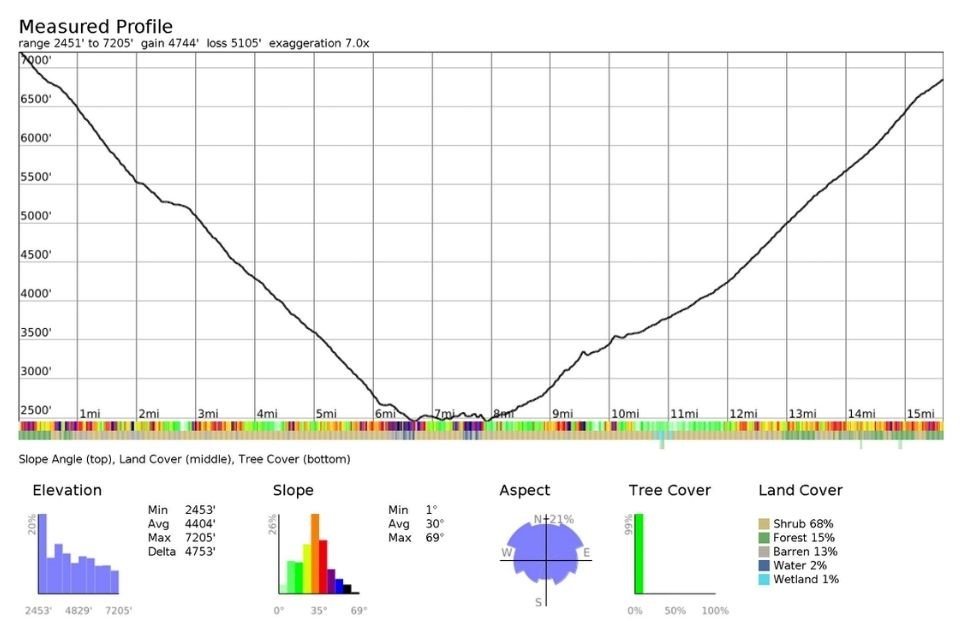
It’s probably the most strenuous day hikes in the U.S., with steep descents and ascents totaling over 20 miles and thousands of feet of elevation change. Most hikers descend the South Kaibab Trail (4780 feet).
Which trails make up the Rim-to-River-to-Rim Loop?
The loop combines the South Kaibab Trail (for the descent) and the Bright Angel Trail (for the ascent for reasons given below).
Which trail is easier — South Kaibab or Bright Angel?
The South Kaibab Trailhead sits higher (7260 feet) than the Bright Angel Trailhead, so there is more elevation gain to hike up this trail. For this reason, many hikers choose to descend via South Kaibab and return on Bright Angel. Bright Angel is longer but offers water stations, while South Kaibab has none. Since your water bottle should be full at the start, most hikers will need to refill before finishing their climb back up.
What are the biggest safety risks?
There is little shade on the trails, and both become hotter as you descend. Narrow canyon walls absorb and radiate heat, adding to the intensity. Over‑drinking water can lead to hyponatremia — a dangerous dilution of sodium in the body, with symptoms such as nausea, confusion, and headaches. Many hikers also overestimate their ability to climb back out and suffer exhaustion. Under‑preparing with inadequate gear, water, or food strategy further increases the risks.
How long does it take to hike the Rim-to-River-to-Rim Loop?
This depends greatly on the time of year (and therefore the temperature), your fitness, and how often you rest. In spring, autumn, or winter, a cooling strategy such as stopping at the river may be unnecessary. In summer, with hotter temperatures and the need for a cooling plan, expect to start at dawn and finish near dusk.
When is the best time to hike the Rim-to-River-to-Rim Loop?
Spring and fall provide cooler temperatures and safer conditions than the intense summer heat. However, as outlined above, I’ve detailed the safest way to enjoy a summer hike. For seasonal planning, weather patterns, and road‑trip ideas, see my Grand Canyon See, Hike, and Survive guide.
Grand Canyon Camping FAQs
Can I camp anywhere in the Grand Canyon?
No — camping is only allowed in designated campgrounds on the rims or at permitted backcountry sites below the rim.
Do I need reservations for campgrounds?
Yes. South Rim and North Rim campgrounds often book out months in advance, so reservations are strongly recommended. Search Grand Canyon National Park in Recreation.gov – Camping, Cabins, RVs, Permits, Passes & More
What are the most popular campgrounds?
South Rim: Mather Campground (tents), Trailer Village (RVs)
North Rim: North Rim Campground (seasonal, open May–October)
Below the Rim: Bright Angel Campground and Havasupai Gardens Campground (permit required)
How do I get a backcountry permit?
Backcountry permits for camping below the rim must be obtained through the National Park Service. Applications can be submitted online at Recreation.gov – Camping, Cabins, RVs, Permits, Passes & More, or in person at the Grand Canyon Backcountry Information Center located at the South Rim.
More Grand Canyon Hiking Guides and Planning Resources
Hiking Safety, Heat & Hydration
For essential advice on avoiding heat illness, managing hydration, and staying safe on strenuous desert trails, explore the full Hiking Safety, Heat & Hydration category.
Southwest Desert Hiking
Explore more canyon, desert, and red‑rock routes across Utah, Nevada, Tucson, and the wider American Southwest — ideal if you’re pairing the Grand Canyon with Zion, Death Valley, Tucson’s desert trails, or the Eastern Sierra.