Note: This route guide was originally published as the High Sierra Trail Loop. I now use the name Hamilton Basin Loop—an unofficial but more accurate description of this 5‑day circuit, which only overlaps part of the High Sierra Trail. The H1 titles remain unchanged for continuity.
The route links together some of the most dramatic terrain on the west side of Sequoia National Park, avoids unnecessary backtracking, and creates a clean, satisfying multi‑day journey through classic High Sierra scenery.
Hamilton Basin Loop Overview
Total Distance
The Hamilton Basin Loop is a 53‑mile backpacking route designed to minimize backtracking and maximize big views, time on the High Sierra Trail, and exploration of the west side of Sequoia National Park. I explain how I pieced the route together in my trip report — Backpack the Hamilton Basin Loop Now: 5‑Day Loop — and while I’m not claiming to be the first person to hike it, the route is, to my knowledge, undocumented and unnamed. Hence the unofficial name: the Hamilton Basin Loop.
Elevation Gain
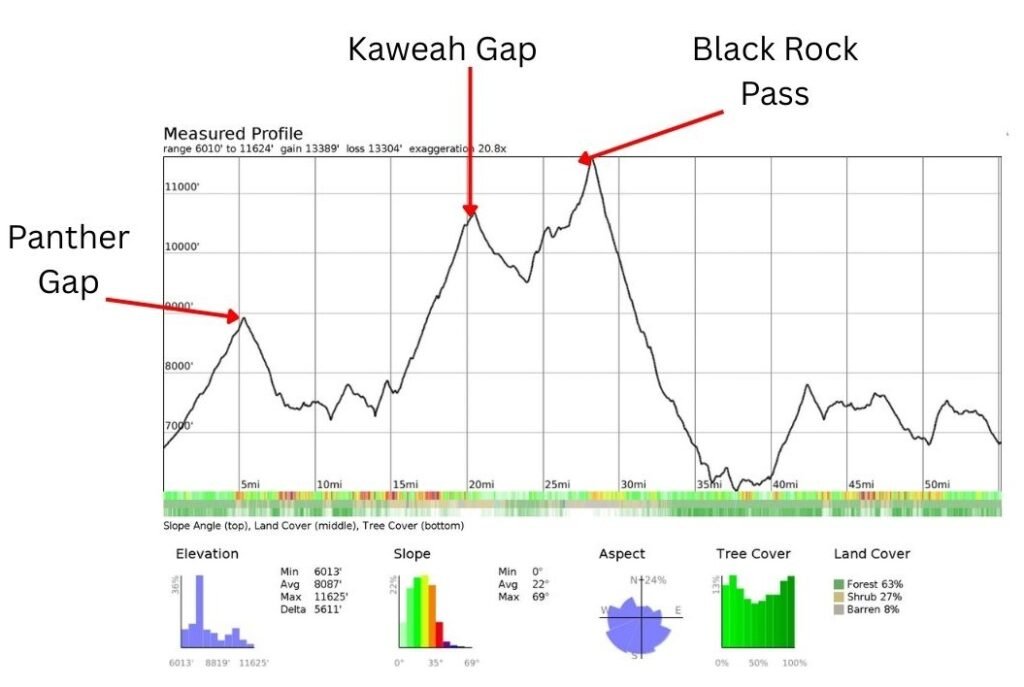
With more than 13,000 feet of elevation gain, this is a strenuous itinerary. We completed it in 4.5 days, but in the itinerary section below I outline ways to shorten or end the loop earlier, along with a few easy wins to reduce elevation gain.
Typical Duration
Most backpackers will find this loop comfortable over 5 or 6 days, depending on fitness, available time, and how much you enjoy relaxing in camp. My itinerary section below includes variations for both.
Difficulty Rating
This route is best suited to hikers with some backcountry camping experience. Navigation is straightforward, water is plentiful, and the trail is generally well‑defined, making it accessible to confident backpackers even if they haven’t tackled a loop of this length before.
Why This Loop Is Special
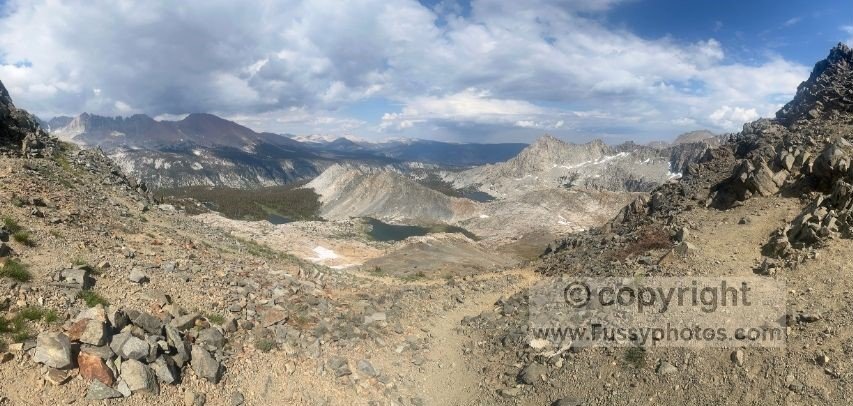
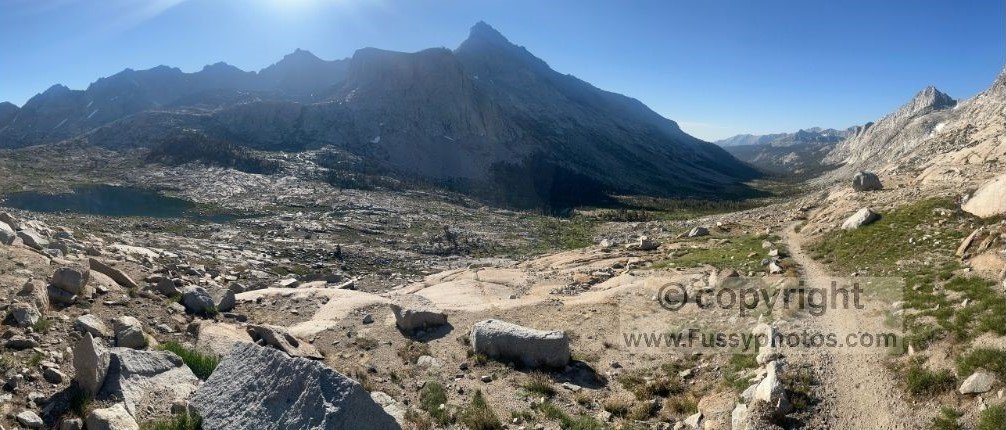
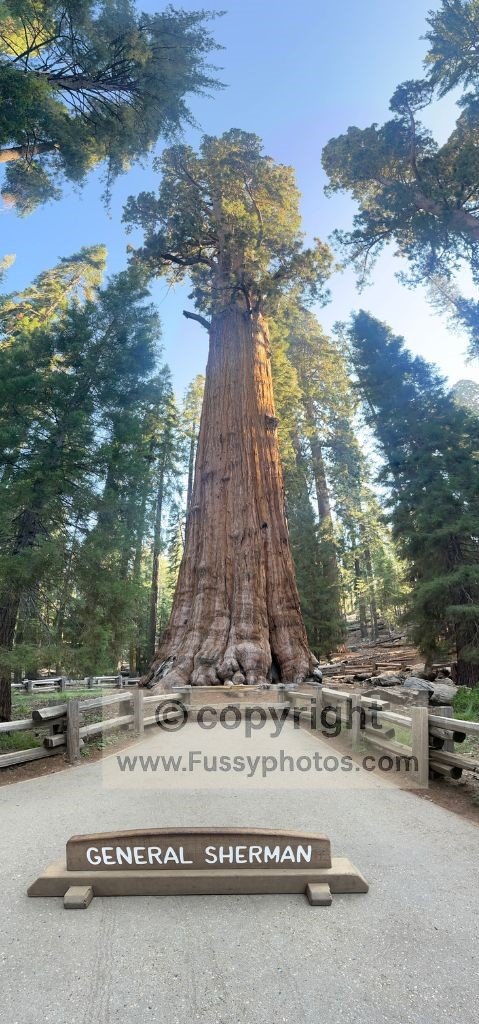
What makes this loop stand out is the sheer variety packed into a single circuit: the drama of the High Sierra Trail through Hamilton Basin, the climb to Kaweah Gap via Precipice Lake, the descent into Big Arroyo, the switchbacks up Black Rock Pass, the quiet beauty of Redwood Meadow, and — if you still have the energy — a grand‑finale finish at the General Sherman Tree.
Who It’s Best For
The Hamilton Basin Loop is ideal for backpackers who want a challenging but achievable multi‑day route with classic High Sierra scenery, reliable water, and a mix of iconic highlights and quieter, less‑visited sections of Sequoia National Park.
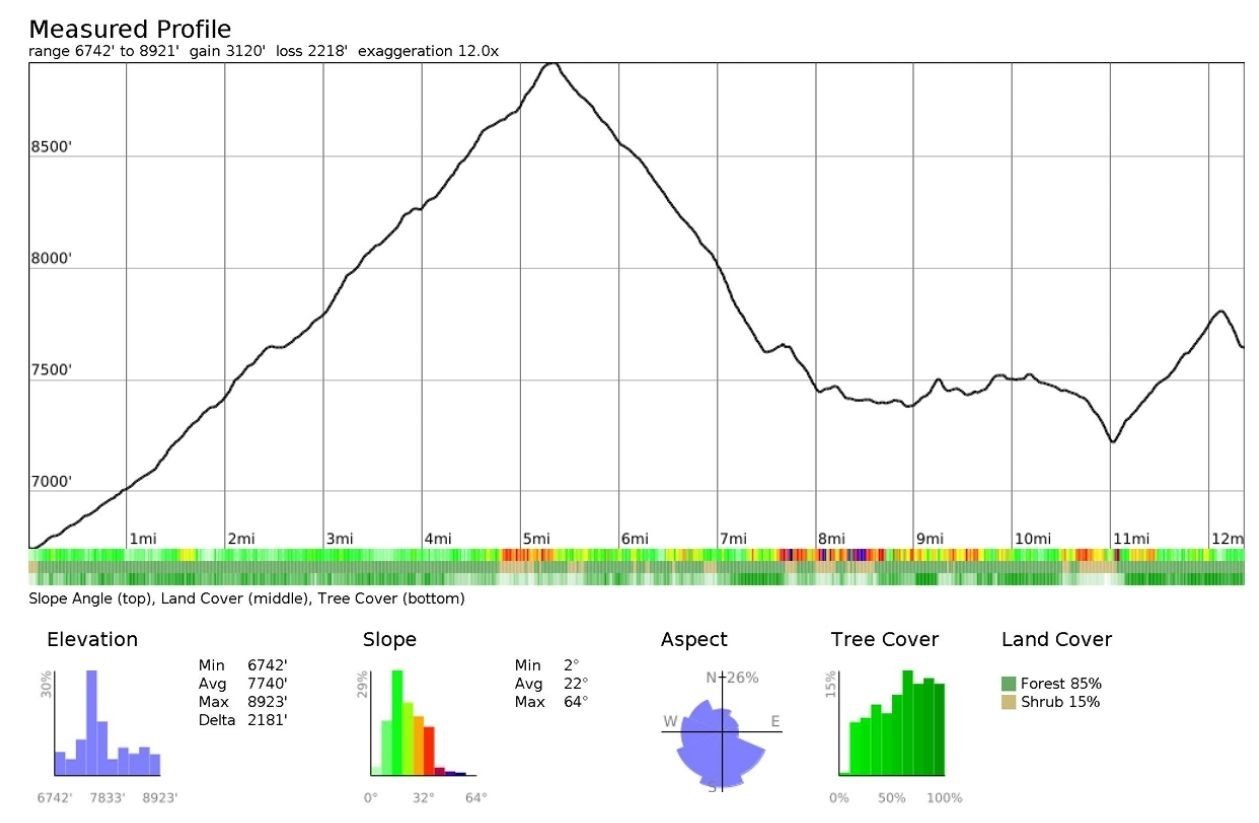
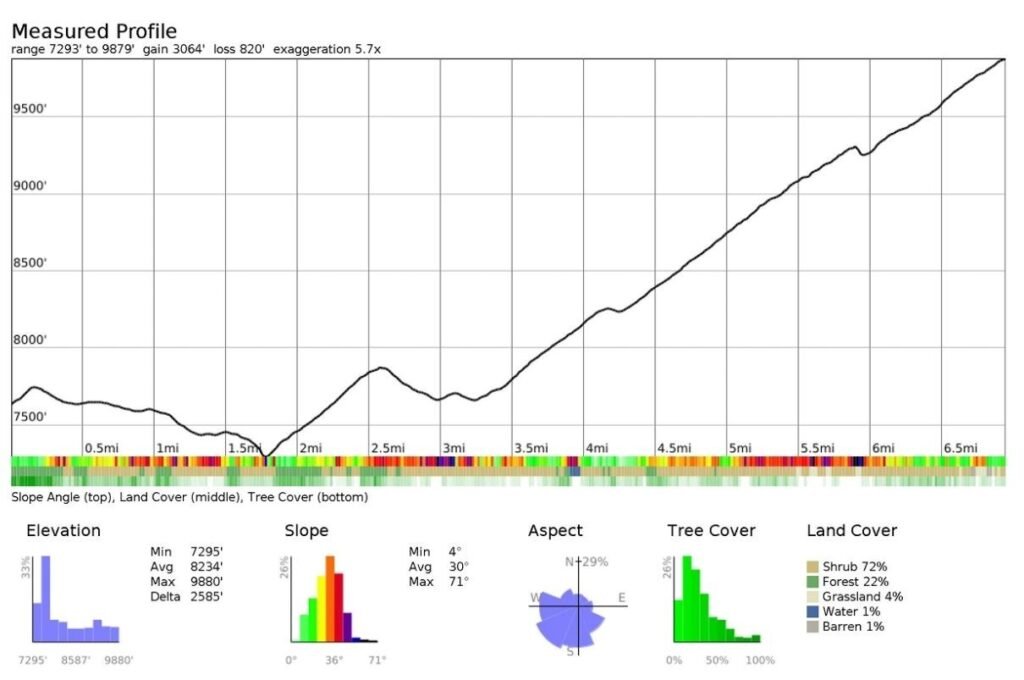
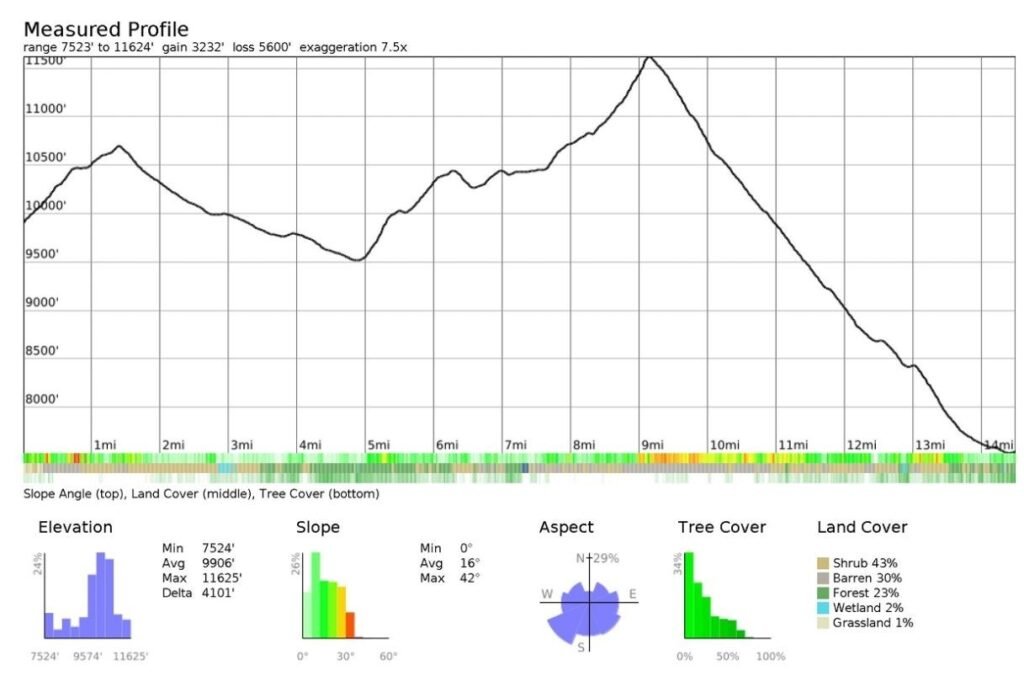
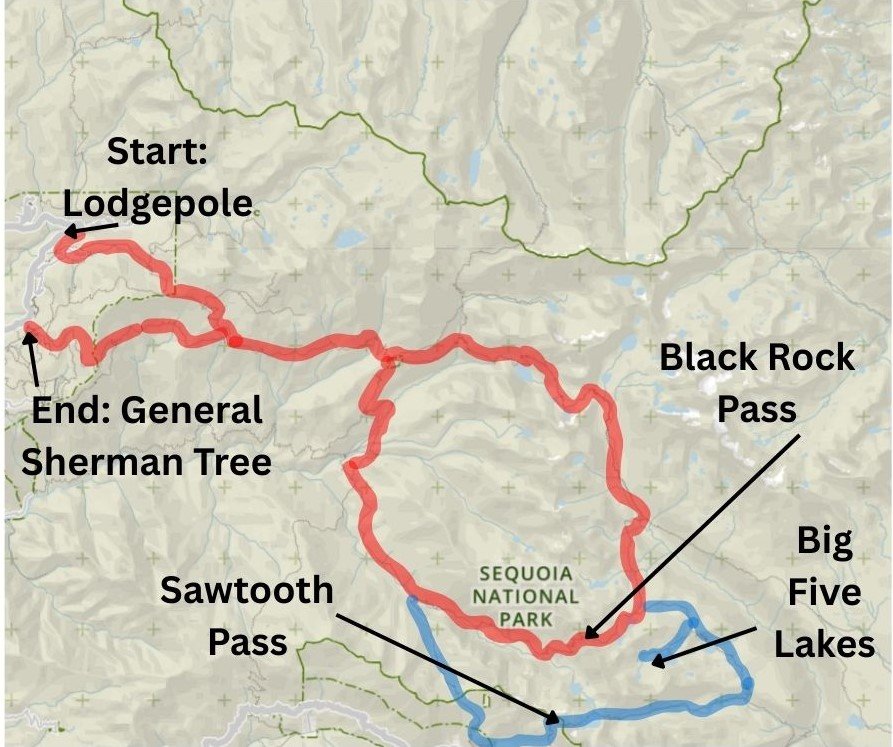
Hamilton Basin Loop Route Map and Elevation Profile
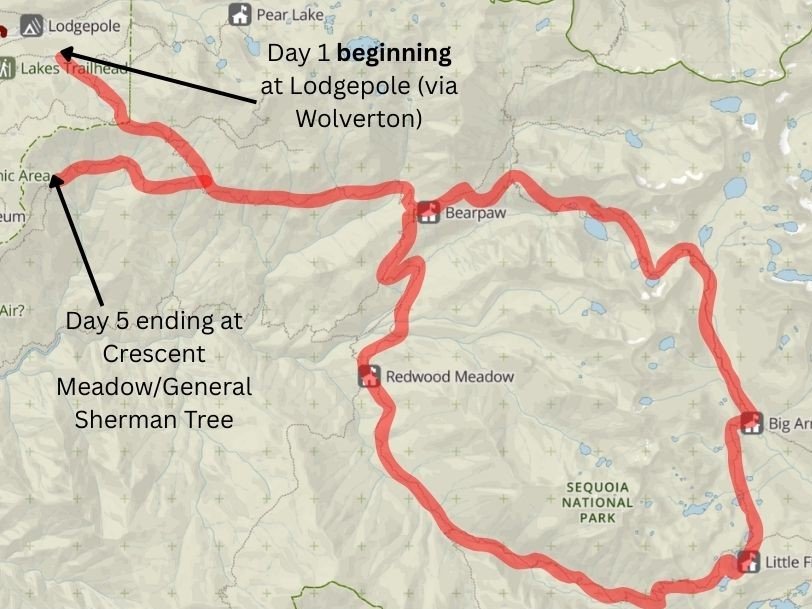
The map below gives a high‑level overview of the entire Hamilton Basin Loop. More detailed maps are included throughout my trip‑report series — Backpack the High Sierra Trail Now — where each day has its own annotated route and key waypoints.
We began our hike from Lodgepole, as our permit allowed entry from either Crescent Meadow or Wolverton (a short walk from Lodgepole). If you need help navigating the permit system, my High Sierra Trail Permits and Loop Alternatives guide walks through the process step‑by‑step and includes a shorter alternative if High Sierra Trail permits are sold out when you book.
Route Overview: From Wolverton to Crescent Meadow via Hamilton Basin
The loop climbs from Lodgepole/Wolverton to Panther Gap, then descends toward the High Sierra Trail via the Panther Gap Trail and Seven Mile Hill Trail, joining the High Sierra Trail. It then crosses Hamilton Basin and Kaweah Gap, drops into Big Arroyo, and leaves the High Sierra Trail via the Big Arroyo Trail and then the Black Rock Pass Trail. From here, it climbs over and down Black Rock Pass, passes through Redwood Meadow, and returns to the trailhead via the Wolverton or Lodgepole exit.
Hamilton Basin Loop Key Junctions
- Wolverton – Start of the trail
- Lakes Trail Junction – Turn right
- Panther Gap – Turn left onto Panther Gap Trail
- Alta Gap Trail Junction – Continue straight onto Seven Mile Hill Trail
- Sierra High Trail Junction – Turn right onto the High Sierra Trail
- Big Arroyo Junction – Stay on the High Sierra Trail until here, then turn right onto Big Arroyo Trail
- Five Little Lakes Junction – Continue, then turn right onto Black Rock Pass Trail
- Theodore Solomons Trail Junction – Continue to the junction, then turn right onto the Theodore Solomons Trail
- Redwood Meadow Cutoff Junction – At Redwood Meadow, keep right to remain on the Theodore Solomons Trail all the way to Bearpaw Meadow
- Bearpaw Meadow – Keep left onto the High Sierra Trail
- Crescent Meadow – Follow the High Sierra Trail back to the finish
Trailheads and Parking
Where to start
There are four logical starting points if your permit allows you to begin your hike on the High Sierra Trail. Each one works for the Hamilton Basin Loop, but they come with different trade‑offs:
Lodgepole Campground
Pros: You can camp here the night before and get an early start. It’s also straightforward to catch a shuttle back here at the end of your hike.
Cons: It makes for a longer first day with more elevation gain than the other three trailheads.
Wolverton Parking
Pros: You can still follow my route via Panther Gap, and you’ll cut off 1.7 miles and about 600 feet of elevation gain compared to starting at Lodgepole.
Cons: If you finish your trip at Crescent Meadow, you’ll need to take three shuttles to get back to your car, versus two if you parked at Lodgepole.
Crescent Meadow
Pros: This is the official start of the High Sierra Trail, and beginning here reduces both mileage and elevation gain compared to Lodgepole or Wolverton.
Cons: If you also finish here, you’ll repeat the first six miles to Mehrten Creek on your return. You could end at Lodgepole or Wolverton to avoid the repetition, but I generally advise against it — the final day would involve a lot of elevation gain when you’re already tired.
General Sherman Parking
Pros: Starting your hike at the General Sherman Tree and walking through Giant Forest is a spectacular way to begin the trip.
Cons: It adds mileage and elevation gain compared to starting at Crescent Meadow. There are camps before Bearpaw Meadow, though, including at Mehrten Creek and just before Buck Creek.
Where to leave your car
There are two simple choices for overnight parking: Lodgepole or Wolverton. All the trailheads above can be reached from these lots, either on foot or by shuttle. For the most up‑to‑date information on seasonal shuttle routes and schedules, check the Sequoia National Park shuttles page (external link).
Permits and Regulations
Permit Pickup at the Lodgepole Visitor Center
You’ll need to collect your wilderness permits in person at the Lodgepole Visitor Center.
How Competitive Are High Sierra Trail Permits?
These permits are competitive — especially in summer — but not the frantic, split‑second race you see in some other regions. You’ll have a moment to make an informed choice, though popular summer dates often sell out in less than half an hour.
Reservation Window
Reservations open six months in advance of your trip.
Bear Canister Requirements
A bear canister is required for all wilderness camping in Sequoia National Park. The FAQs on my High Sierra Trail Permits page cover storage rules and canister options in more detail.
Best Time of Year
Snow Considerations
Early‑season snow is the biggest factor shaping when you can safely hike the Hamilton Basin Loop. Kaweah Gap, Black Rock Pass, and the shaded sections of Hamilton Basin can hold snow well into June in a heavy year. Expect lingering patches, high creek crossings, and slower travel if you go too early. Most hikers will find mid‑July through September to be the most reliable window. We went mid-July and the weather was perfect and snow patches were gone.
Mosquito Season
Mosquitoes can be intense from late June through mid‑July, especially around Hamilton Lakes, Big Arroyo, and the meadows near Redwood Meadow. By August, they usually taper off quickly, and by September they’re rarely an issue.
Daylight Hours
Long summer days make this loop feel more manageable, especially if you’re covering big miles or want time to linger at lakes. By late September, daylight drops quickly, and you’ll need to plan your mileage with shorter evenings in mind.
Shoulder‑Season Pros and Cons
Late June and late September can be magical: quieter trails, cooler temperatures, and beautiful light. But both ends of the season come with trade‑offs. Early summer may still have snow and high water, while late September can bring cold nights and the first storms of autumn. If you’re comfortable with a bit of uncertainty, shoulder season can be incredibly rewarding — just build in flexibility.
Campsites and Itinerary Options
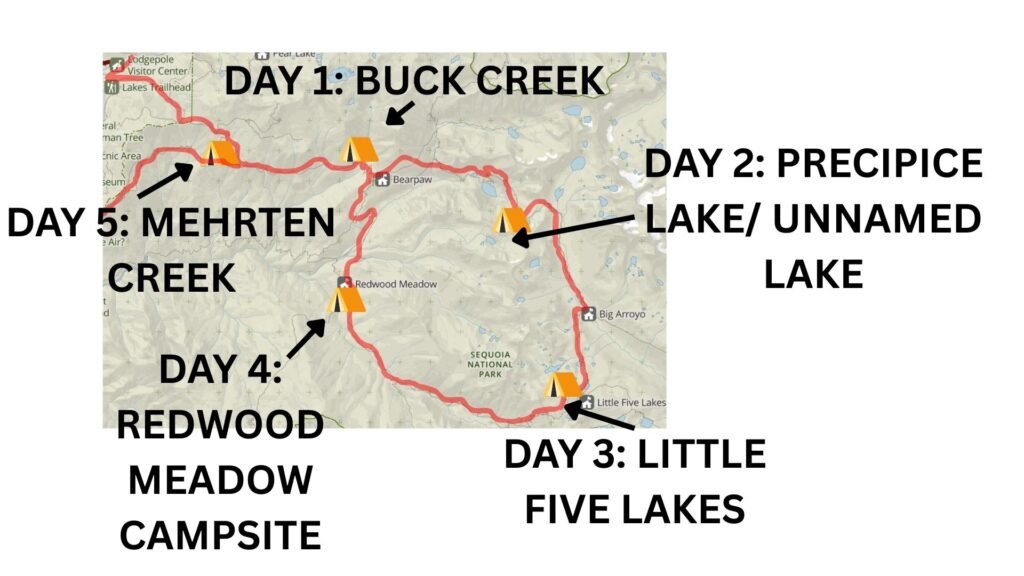
5‑Day Hamilton Basin Loop Itinerary (What We Did)
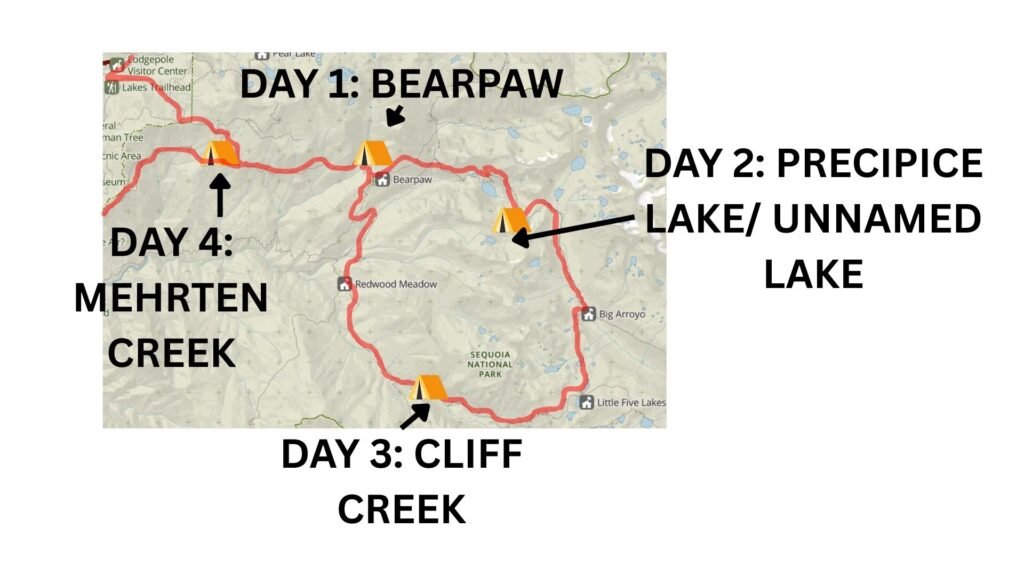
Base map courtesy of the National Park Service (NPS), annotations by Fussyphotos (Jack).
Day 1 – Lodgepole to Bearpaw Meadow
12 miles, +3100 feet elevation gain
Having already explored Giant Forest the previous day, we began at Lodgepole and skipped Crescent Meadow to avoid repeating those miles later in the trip. It’s a long but steady ascent to Panther Gap, followed by a descent on the Seven Mile Hill Trail to join the High Sierra Trail. We camped at Bearpaw Meadow, resisting the temptation to stop early at the attractive camp just before Buck Creek, where you can cool off and fall asleep to the sound of running water.
Campsite recommendations:
Bearpaw Meadow if you want to keep Day 2 manageable.
Buck Creek if you start late.
Full photos and notes from this day are in my Day 1 trip report.
Day 2 – Bearpaw Meadow to Hamilton Lakes Basin
7 miles, +3,000 feet elevation gain
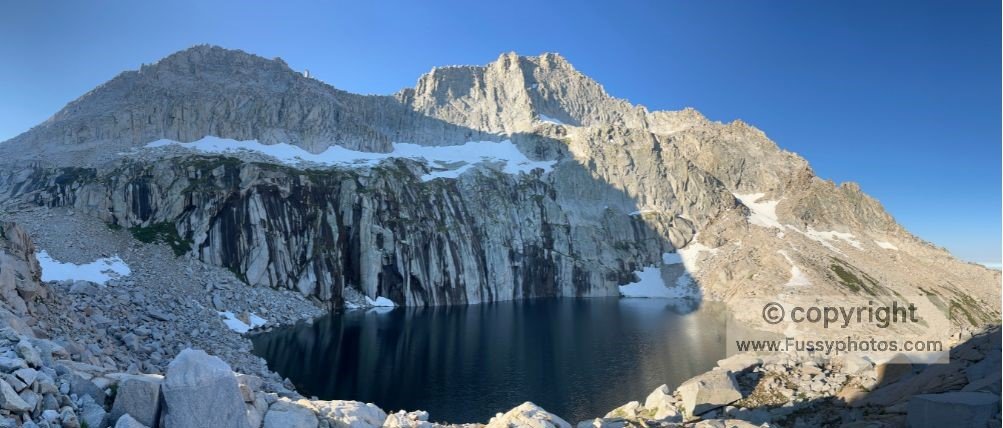
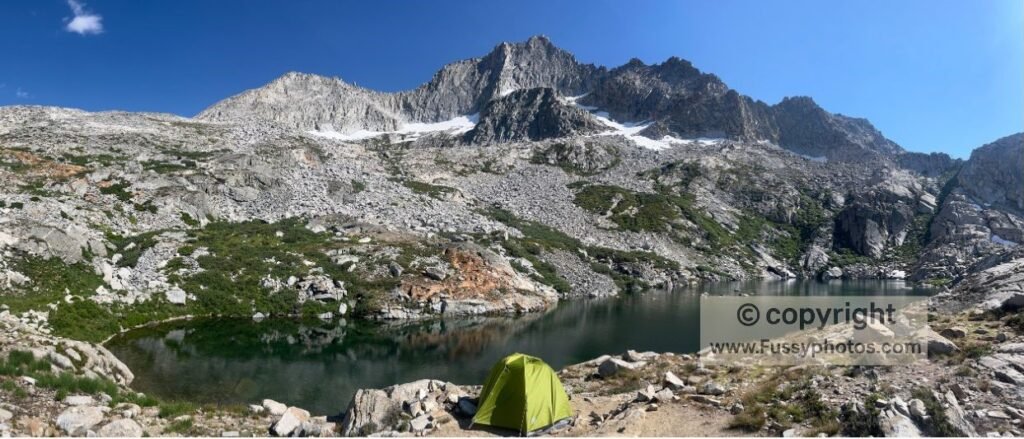
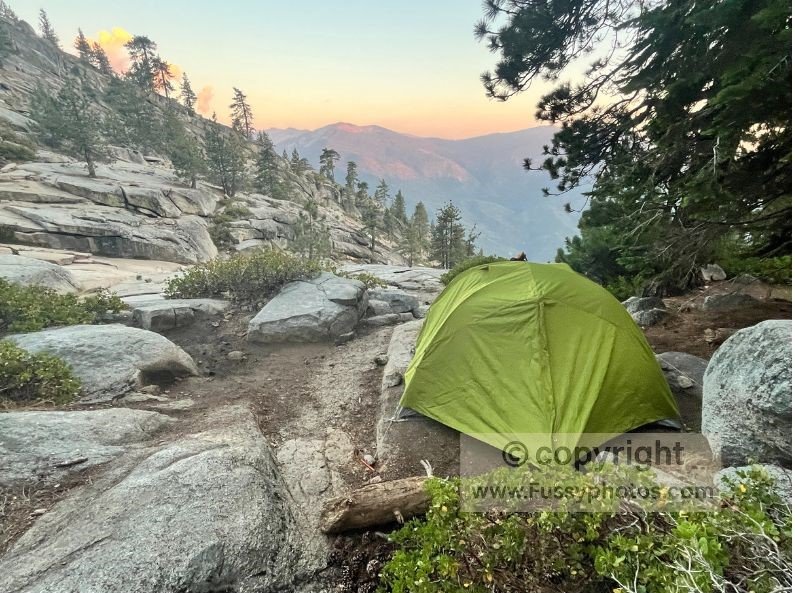
A short day in mileage but another big climb. We had planned to continue another half‑mile and 400 feet to Precipice Lake, but were so blown away by the unnamed lake below it that we stopped there instead. This made Day 3 slightly longer as we played catch‑up, and many hikers will still prefer camping at Precipice Lake, often described as one of the best backcountry camps in the US.
Camp recommendations:
The unnamed lake below Precipice Lake offers flatter tent spots and more space.
Precipice Lake is equally beautiful but more crowded, with limited flat ground among the boulders.
I’ve shared full photos and a detailed write‑up of this day in my Day 2 trip report.
Day 3 – Hamilton Lakes Basin – Cliff Creek Campsite
14.5 miles, +3,250 feet elevation gain
Our longest and hardest day, but definitely the most beautiful. We passed Precipice Lake, climbed to Kaweah Gap, descended into Big Arroyo, skirted Little Five Lakes, and enjoyed superb views from Black Rock Pass before the long descent to Cliff Creek. If you stayed at the unnamed lake below Precipice Lake, I’d recommend shortening this day by camping at Pinto Lake instead.
Camp recommendations:
Cliff Creek is a quiet, private campsite.
Pinto Lake is busier (and was buggy when we passed) but lets you shave off some mileage.
You can see the full photo set and my notes from this section in the Day 3 trip report.
Day 4 – Cliff Creek to Mehrten Creek
14 miles, +3,074 feet elevation gain
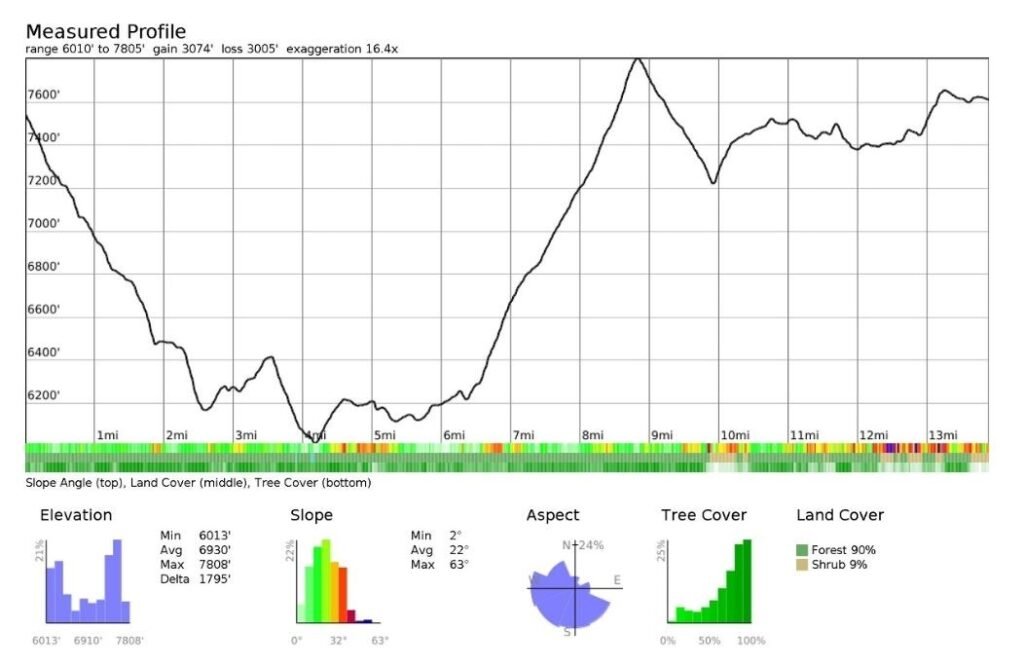
Not even our longest, hardest day on paper. The ascent from Redwood Meadow to Bearpaw was a stifling, hot grind, but we still reached camp two hours earlier than on Day 3. Buck Creek makes an excellent late‑lunch stop to cool off — just resist the temptation to stay all afternoon if you need to make a quick exit on Day 5.
Camp recommendations:
Mehrten Creek if you want to visit General Sherman Tree before finishing on Day 5.
Buck Creek is a tempting option if you’re comfortable with a full final day.
A halfway‑house option is the campsite one mile west of Buck Creek, though it lacks the views of Mehrten Creek and the cooling pools of Buck Creek.
More photos and a breakdown of this day are in my Day 4–5 trip report.
Day 5 – Mehrten Creek to Crescent Meadow/General Sherman Tree
7.5 miles, +971 feet elevation gain to General Sherman Tree

Having already spent time at Lodgepole and Giant Forest acclimatising before our hike, we skipped the General Sherman Tree on our final morning. But when planning the route, the idea of a grand‑finale finish at the world’s largest tree was one of the major attractions — surely one of the best possible endings to any backcountry hike.
6‑Day Hamilton Basin Loop Itinerary (With a 7th day if you want to hike Mineral King)
With abundant water along most of the route, time and space in your bear cannister are your biggest constraints. With big days and so much to fit in a 6 day loop may be more suitable for your needs. Here’s the 6-day loop I would have followed:
Base map courtesy of the National Park Service (NPS), annotations by Fussyphotos (Jack).
Day 1 – Lodgepole – Buck Creek
11 miles, +2600 feet elevation gain
This allows you to follow the original route but to stop an hour earlier. Buck Creek is a more scenic campground than Bearpaw, had no bugs and a creek to cool off in – three big wins.
Day 2 – Buck Creek to Hamilton Lakes/Precipice Lake
8 miles, +3900 feet elevation
Still a big day but a great one. Camping at the lake below Precipice Lake takes some of the elevation gain off.
Day 3 – Precipice Lake to Little Five Lakes
8 miles, +2100 feet elevation gain
A early ascent to Kaweah Gap, a long descent to Big Arroyo and then I’d recommend camping at the last of the Five Little Lakes for the best views and nicest lake- the one closest to Black Rock Pass.
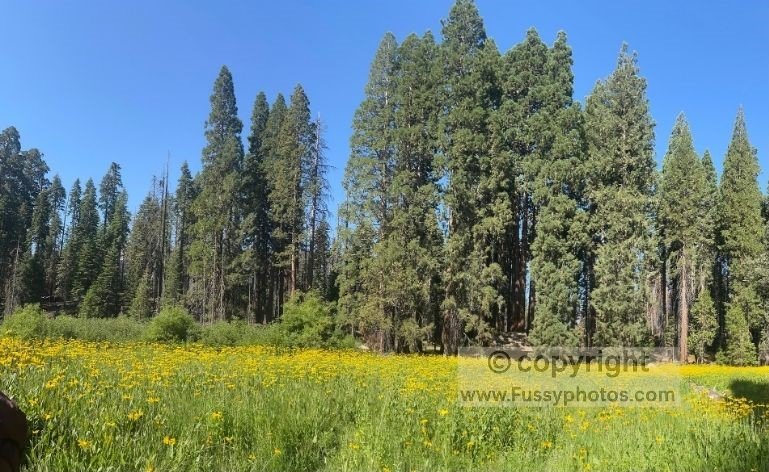
Day 4 – Little Five Lakes to Redwood Meadow
10 miles, +1100 feet elevation gain
The majority of elevation gain here is Black Rock Pass. From here it’s a long downhill stretch almost all the way to Redwood Meadow. Camp amongst the sequoia trees.
Day 5 – Redwood Meadow to Mehrten Creek
10 miles, + 2750 feet elevation gain
The majority of the elevation gain would be in the morning as far as Bearpaw Meadow. Mehrten Creek is the furthest campsite west on the High Sierra Trail.
Day 6 – Mehrten Creek to General Sherman
7.69 miles, + 1000 feet elevation gain.
Finish in style at General Sherman Tree then take the shuttle back to your car.
Optional Mineral King Extension
One of our favorite sections of the entire loop was the view from Black Rock Pass, particularly looking south toward Mineral King. Columbine, Cyclamen, and Spring Lakes looked rugged, empty, and incredibly inviting — the kind of terrain that makes you want to keep going.
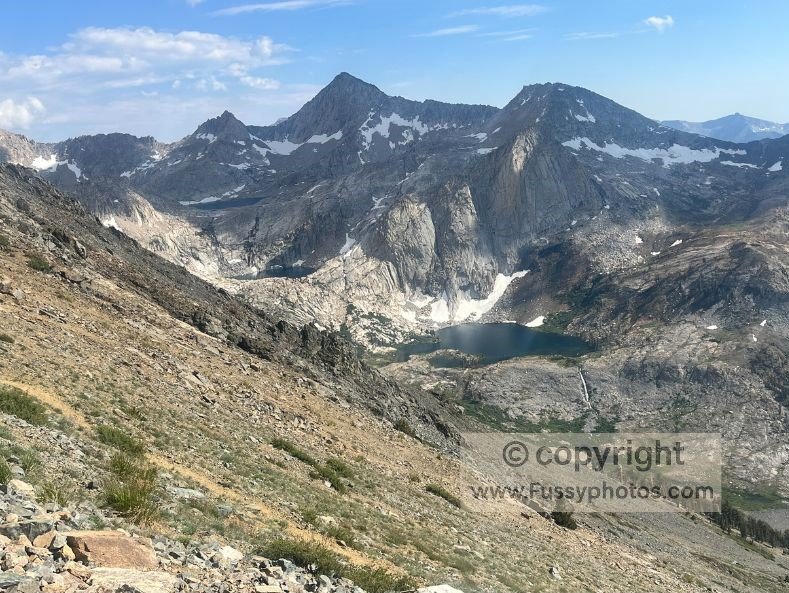
If you substitute the ascent and descent from Black Rock Pass with a continuation toward Big Five Lakes and Sawtooth Pass, you’ll add roughly 12 miles and about 3,800 feet of additional elevation gain before re‑joining the route at the Timber Gap Trail and Cliff Creek Trail junction. For most hikers, that’s enough to justify turning the trip into a 7‑day itinerary.

Hamilton Basin Loop: FAQs
How long is the Hamilton Basin Loop?
The loop is approximately 53 miles with more than 13,000 feet of elevation gain, linking Hamilton Basin, Kaweah Gap, Big Arroyo, Black Rock Pass, and Redwood Meadow. The final mileage will depend on which of the four potential entry and
How many days do most people need?
Most backpackers will find the loop comfortable in 5–6 days, depending on fitness and how much time they want in camp. Your guide includes both versions, plus an optional Mineral King extension that makes it a natural 7‑day itinerary.
Is water reliable on the loop?
Yes — very. Water is abundant throughout the route, which means your main constraints are time and bear‑canister space, not water carries. This is one of the reasons the loop works so well over 5–6 days.
Where should I start the loop?
You can begin at Lodgepole, Wolverton, Crescent Meadow, or General Sherman. Each has trade‑offs in mileage, elevation gain, and shuttle logistics. Lodgepole and Wolverton are the simplest for parking and permit pickup.
Do I need a permit?
Yes. You must pick up your wilderness permit in person at the Lodgepole Visitor Center. High Sierra Trail permits are competitive but not a split‑second race; popular summer dates often sell out within 30 minutes.
Do I need a bear canister?
Yes — bear canisters are required for all wilderness camping in Sequoia National Park.
Is the Mineral King extension worth it?
If you want a more rugged, remote finish, yes. Continuing toward Big Five Lakes and Sawtooth Pass adds about 12 miles and 3,800 feet of climbing before rejoining the loop, making it a natural 7‑day itinerary.
Is there a lot of backtracking?
No — the Hamilton Basin Loop is designed specifically to minimize repetition. Starting at Crescent Meadow introduces some repeated miles, but Lodgepole or Wolverton avoids this.
Discover More Sequoia National Park Adventures
For a full account of this route in real backcountry conditions, read the 5‑day trip report covering the complete Hamilton Basin Loop with day‑by‑day details, camps, and on‑trail insights. Button: Backpack the High Sierra Trail now: 5‑day loop
To dive deeper into the park itself, explore what makes Sequoia National Park so special and discover how to spend one unforgettable day in Sequoia NP.
Route Guides of the American West
For more map‑driven route guides with elevation profiles, campsite ideas, itinerary options, and practical planning advice, explore the full collection of hiking and backpacking routes across the American West.